手写spring主要是为了熟悉源码,所以参考源码实现了一个简单的spring。
源码:spring-projects/spring-framework: Spring Framework (github.com)
1.自定义注解
要使用@Controller就要导入spring-context依赖,所以源码也在spring-context下
官方源码:
参考官方源码:
新建com.dreams.springframework.stereotype包,在其下新建四个注解
@Controller,@Service,@Repository都有带@Component父注解
源码有个@Documented注解,生成帮助文档的,没什么用,就不加。
首先实现Component
package com.dreams.springframework.stereotype;

import java.lang.annotation.ElementType;
import java.lang.annotation.Retention;
import java.lang.annotation.RetentionPolicy;
import java.lang.annotation.Target;

@Target(ElementType.TYPE) //TYPE:用于描述类、接口(包括注解类型) 或enum声明
@Retention(RetentionPolicy.RUNTIME) //注解不仅被保存到class文件中,jvm加载class文件之后,仍然存在;
public @interface Component {
    String value() default ""; //注解参数
}
如下代码,
@AliasFor(annotation = Component.class) 该注解是为了属性起别名,但是我暂时只是想实现一个简单的spring,就不写它了
实现@Controller
package com.dreams.springframework.stereotype;

import java.lang.annotation.ElementType;
import java.lang.annotation.Retention;
import java.lang.annotation.RetentionPolicy;
import java.lang.annotation.Target;

@Target(ElementType.TYPE) //TYPE:用于描述类、接口(包括注解类型) 或enum声明
@Retention(RetentionPolicy.RUNTIME) //注解不仅被保存到class文件中,jvm加载class文件之后,仍然存在;
@Component
public @interface Controller {
    //@AliasFor(annotation = Component.class)
    String value() default ""; //注解参数
}
实现@Service
package com.dreams.springframework.stereotype;

import java.lang.annotation.ElementType;
import java.lang.annotation.Retention;
import java.lang.annotation.RetentionPolicy;
import java.lang.annotation.Target;

@Target(ElementType.TYPE) //TYPE:用于描述类、接口(包括注解类型) 或enum声明
@Retention(RetentionPolicy.RUNTIME) //注解不仅被保存到class文件中,jvm加载class文件之后,仍然存在;
@Component
public @interface Service {

    //@AliasFor(annotation = Component.class)
    String value() default ""; //注解参数
}
实现@Repository
package com.dreams.springframework.stereotype;

import java.lang.annotation.ElementType;
import java.lang.annotation.Retention;
import java.lang.annotation.RetentionPolicy;
import java.lang.annotation.Target;

@Target(ElementType.TYPE) //TYPE:用于描述类、接口(包括注解类型) 或enum声明
@Retention(RetentionPolicy.RUNTIME) //注解不仅被保存到class文件中,jvm加载class文件之后,仍然存在;
@Component
public @interface Repository {

    //@AliasFor(annotation = Component.class)
    String value() default ""; //注解参数
}
实现@Autowired
package com.dreams.springframework.stereotype;
import java.lang.annotation.ElementType;
import java.lang.annotation.Retention;
import java.lang.annotation.RetentionPolicy;
import java.lang.annotation.Target;

/**
 *   ElementType:
 *     CONSTRUCTOR:用于描述构造器
 *     METHOD:用于描述方法
 *     FIELD:用于描述域
 *     LOCAL_VARIABLE:用于描述局部变量
 *     PACKAGE:用于描述包
 *     PARAMETER:用于描述参数
 *     TYPE:用于描述类、接口(包括注解类型) 或enum声明
 */
@Target({ElementType.CONSTRUCTOR, ElementType.METHOD, ElementType.PARAMETER, ElementType.FIELD, ElementType.ANNOTATION_TYPE})
@Retention(RetentionPolicy.RUNTIME)
public @interface Autowired {
    //参数默认值为true
    boolean required() default true;
}
2.BeanDefinition 类
BeanDefinition 主要是用来描述 Bean,其存储了 Bean 的相关信息,Spring 实例化 Bean 时需读取该 Bean 对应的 BeanDefinition。BeanDefinition 整体可以分为两类,一类是描述通用的 Bean,还有一类是描述注解形式的 Bean。
官方源码:
所以我们新建一个BeanDefinition 类
package com.dreams.springframework.beans.factory.config;


/**
 * @author PoemsAndDreams
 * Bean的定义类
 */
public class BeanDefinition {

    private String BeanName;
    private Class clazz;

    //其他信息,如单例等,这里实现一个简单的spring,就不实现了


    //Getter and Setter
    public Class getClazz() {
        return clazz;
    }

    public void setClazz(Class clazz) {
        this.clazz = clazz;
    }

    public String getBeanName() {
        return BeanName;
    }

    public void setBeanName(String beanName) {
        BeanName = beanName;
    }
}
3.Bean工厂类
ConfigurableListableBeanFactory为父接口
package com.dreams.springframework.beans.factory.config;

import com.dreams.springframework.beans.factory.xml.XmlBeanDefinitionReader;

import java.util.concurrent.ConcurrentHashMap;

/**
 * @author PoemsAndDreams
 * @description //TODO
 */
public interface ConfigurableListableBeanFactory {

    ConcurrentHashMap<String, Object> getInstanceMap();

    ConcurrentHashMap<String, BeanDefinition> getBeanDefinitionMap();

    Object getBean(String beanName);

    Object getBean(Class<?> clazz);

    void createBeanInstance() ;
}
默认实现为DefaultListableBeanFactory
将上面的beanDefinition存储在beanDefinitionMap属性中,
InstanceMap存储实例化后的对象
package com.dreams.springframework.beans.factory.config;

import com.dreams.springframework.stereotype.Autowired;

import java.lang.reflect.Field;
import java.lang.reflect.InvocationTargetException;
import java.util.concurrent.ConcurrentHashMap;

/**
 * @author PoemsAndDreams
 * @description //默认工厂实现类
 */
public class DefaultListableBeanFactory implements ConfigurableListableBeanFactory {

    //存储bean定义信息,所以扫描到的
    ConcurrentHashMap<String,BeanDefinition> beanDefinitionMap = new ConcurrentHashMap<>();

    //实例化存储
    ConcurrentHashMap<String, Object> InstanceMap = new ConcurrentHashMap<>();

    @Override
    public ConcurrentHashMap<String, BeanDefinition> getBeanDefinitionMap() {
        return beanDefinitionMap;
    }

    @Override
    public ConcurrentHashMap<String, Object> getInstanceMap() {
        return InstanceMap;
    }

    @Override
    public void createBeanInstance() {
        //......
    }


    @Override
    public Object getBean(String beanName){
        //......
    }

    @Override
    public Object getBean(Class<?> clazz) {
        //......
    }


    //@Autowired注入逻辑
    public void postProcessProperties() {
        //......
    }

}
主要方法的逻辑是
createBeanInstance()方法负责根据存储在 beanDefinitionMap 中的定义来创建 bean 的实例
@Override
public void createBeanInstance() {
    for (String beanName : beanDefinitionMap.keySet()) {
        BeanDefinition beanDefinition = beanDefinitionMap.get(beanName);
        Class clazz = beanDefinition.getClazz();
        try {
            //实例化
            Object instance = clazz.getDeclaredConstructor().newInstance();
            //保存至InstanceMap,方便使用
            InstanceMap.put(beanName, instance);
        } catch (InstantiationException e) {
            throw new RuntimeException(e);
        } catch (IllegalAccessException e) {
            throw new RuntimeException(e);
        } catch (InvocationTargetException e) {
            throw new RuntimeException(e);
        } catch (NoSuchMethodException e) {
            throw new RuntimeException(e);
        }
    }
    //自动注入逻辑
    this.postProcessProperties();
}
在上面已经获取到bean的实例后,就是实现@Autowired注解的逻辑了,即将bean实例注入到@Autowired标注的属性中,于是就调用postProcessProperties()
方法代码如下:
//@Autowired注入逻辑
public void postProcessProperties() {

    for (String beanName : beanDefinitionMap.keySet()) {
        BeanDefinition beanDefinition = beanDefinitionMap.get(beanName);
        //获取到实际的class
        Class clazz = beanDefinition.getClazz();
        //获取到所有字段
        Field[] declaredFields = clazz.getDeclaredFields();
        for (Field declaredField : declaredFields) {
            //是否有Autowired注解
            if (declaredField.isAnnotationPresent(Autowired.class)) {
                Class<?> aClass = declaredField.getType();
                Object instance = null;
                try {
                    String name = declaredField.getName();
                    //获取实现该接口的类
                    instance = InstanceMap.get(name);
                    Object o = InstanceMap.get(beanName);
                    declaredField.setAccessible(true);
                    declaredField.set(o, instance);
                } catch (IllegalAccessException e) {
                    throw new RuntimeException(e);
                }
            }

        }

    }

}
ClassPathXmlApplicationContext的getBean方法需要获取到bean实例,所以我们在Bean工厂提供这两个方法。根据给定的 beanName,从 InstanceMap 中获取对应的 bean 实例方法以及根据给定的 clazz(类类型),从 beanDefinitionMap 中寻找对应的 bean 实例方法。
@Override
public Object getBean(String beanName){
    Object o = InstanceMap.get(beanName);
    //获取不到即抛出异常
    if (o == null){
        throw new RuntimeException("No bean named" + beanName +" available");
    }
    return o;
}

@Override
public Object getBean(Class<?> clazz) {
    Object bean = new Object();
    for (BeanDefinition value : beanDefinitionMap.values()) {
        Class aClass = value.getClazz();
        if (aClass == clazz){
            String beanName = value.getBeanName();
            bean = InstanceMap.get(beanName);
            return bean;
        }
    }
    //获取不到即抛出异常
    throw new RuntimeException("No qualifying bean of type" + clazz + " available");
}
4.xml解析类
接下来就是xml解析类了
package com.dreams.springframework.beans.factory.xml;

import com.dreams.springframework.beans.factory.config.ConfigurableListableBeanFactory;
import com.dreams.springframework.stereotype.Component;
import com.dreams.springframework.stereotype.Repository;
import com.dreams.springframework.stereotype.Service;
import org.dom4j.Attribute;
import org.dom4j.Document;
import org.dom4j.DocumentException;
import org.dom4j.Element;
import org.dom4j.io.SAXReader;
import com.dreams.springframework.stereotype.Controller;
import com.dreams.springframework.beans.factory.config.BeanDefinition;

import java.io.File;
import java.io.IOException;
import java.io.InputStream;
import java.net.URL;
import java.util.concurrent.ConcurrentHashMap;

/**
 * @author PoemsAndDreams
 * @description xml解析类
 */
public class XmlBeanDefinitionReader {


    //加载xml配置文件
    public void loadBeanDefinitions(ConfigurableListableBeanFactory beanFactory, String configResources){
        //......
    }

    private void findScanPackagePath(ConfigurableListableBeanFactory beanFactory, String scanPackage) {
        //......

    }

    //加载
    private void loadAllClass(ConfigurableListableBeanFactory beanFactory, File path) {
        //......
    }


    //获取扫描包
    private String getComponentScanPackage(String configResources) {
        //。。。。。。
    }
}
逻辑如下:
加载xml配置文件主要调用loadBeanDefinitions方法
//加载xml配置文件
public void loadBeanDefinitions(ConfigurableListableBeanFactory beanFactory, String configResources){
    //获取扫描包
    String scanPackage = getComponentScanPackage(configResources);
    //获取扫描包路径
    findScanPackagePath(beanFactory,scanPackage);
}
获取扫描包getComponentScanPackage方法,使用了 DOM4J 库来解析 XML 文件,并提取属性值作为扫描包的路径。也就是要获取com.dreams

代码如下:
//获取扫描包
private String getComponentScanPackage(String configResources) {
    //DOM4J 解析 XML
    InputStream resourceAsStream = null;

    try {
        //创建 SAXReader 对象
        SAXReader saxReader = new SAXReader();
        //获取class对象加载文件返回流
        resourceAsStream = XmlBeanDefinitionReader.class.getClassLoader().getResourceAsStream(configResources);
        //获取document对象
        Document document = saxReader.read(resourceAsStream);
        //获取根节点
        Element rootElement = document.getRootElement();
        //获取扫描包
        Element element = rootElement.element("component-scan");
        Attribute attribute = element.attribute("base-package");
        return attribute.getValue();
    } catch (DocumentException e) {
        throw new RuntimeException(e);
    }finally {
        if (resourceAsStream != null){
            try {
                resourceAsStream.close();
            } catch (IOException e) {
                throw new RuntimeException(e);
            }
        }
    }

}
findScanPackagePath方法通过getComponentScanPackage返回的包名com.dreams获取真正的路径,这里因为获取到的目录可能有空格,所以简单替换一下:
private void findScanPackagePath(ConfigurableListableBeanFactory beanFactory, String scanPackage) {
    ClassLoader classLoader = XmlBeanDefinitionReader.class.getClassLoader();
    scanPackage = scanPackage.replace(".","/");
    URL url = classLoader.getResource(scanPackage);
    //因为获取的目录可能含有空格,且会使用%20替代空格,所以我们需要替换回去
    String urlFile = url.getFile();
    if (urlFile.contains("%20")){
        urlFile = urlFile.replace("%20"," ");
    }
    File file = new File(urlFile);
    //加载并实例化
    loadAllClass(beanFactory,file);

}
最后findScanPackagePath方法会调用loadAllClass加载全部的class
扫描指定目录下的所有 .class 文件,并加载这些文件中定义的类。如果类上标注了 @Component、@Controller、@Service 或 @Repository 注解,则将这些类作为 Spring Bean 添加到 ConfigurableListableBeanFactory 中的beanDefinitionMap,默认以配置的value为key,否则以开头小写的类名作为key也就是实例名。
//加载
private void loadAllClass(ConfigurableListableBeanFactory beanFactory, File path) {
    ConcurrentHashMap<String, BeanDefinition> beanDefinitionMap = beanFactory.getBeanDefinitionMap();
    File[] files = path.listFiles();
    for (File file : files) {
        //如果是个目录
        if (!file.isDirectory()){
            //获取文件路劲
            String fileName = file.getAbsolutePath();
            if (fileName.endsWith(".class")){
                String className = fileName.substring(fileName.indexOf("com"), fileName.indexOf(".class"));
                className = className.replace("\\",".");
                //获取类加载器
                ClassLoader classLoader = XmlBeanDefinitionReader.class.getClassLoader();
                try {
                    //加载类
                    Class<?> clazz = classLoader.loadClass(className);

                    //类是否有Component,Service,Controller,Repository注解
                    if (clazz.isAnnotationPresent(Component.class) || clazz.isAnnotationPresent(Controller.class) || clazz.isAnnotationPresent(Service.class) || clazz.isAnnotationPresent(Repository.class)){

                        Component componentAnnotation = clazz.getDeclaredAnnotation(Component.class);
                        Controller controllerAnnotation = clazz.getDeclaredAnnotation(Controller.class);
                        Service serviceAnnotation = clazz.getDeclaredAnnotation(Service.class);
                        Repository repositoryAnnotation = clazz.getDeclaredAnnotation(Repository.class);

                        String value = "";
                        //Bean定义类
                        BeanDefinition beanDefinition = new BeanDefinition();
                        //判断注解是否有value值
                        if (componentAnnotation != null || controllerAnnotation != null || serviceAnnotation != null || repositoryAnnotation != null){
                            if (componentAnnotation != null && !componentAnnotation.value() .equals("")){
                                value = componentAnnotation.value();
                            }else if (controllerAnnotation != null && !controllerAnnotation.value().equals("")){
                                value = controllerAnnotation.value();
                            }else if (serviceAnnotation != null && !serviceAnnotation.value().equals("")){
                                value = serviceAnnotation.value();
                            } else if (repositoryAnnotation != null && !repositoryAnnotation.value().equals("")) {
                                value = repositoryAnnotation.value();
                            } else {
                                String name = clazz.getSimpleName();
                                //默认以开头小写的类名作为实例名
                                value = name.valueOf(name.charAt(0)).toLowerCase() + name.substring(1);

                            }
                            //不能重名
                            if (beanDefinitionMap.get(value) != null) {
                                throw new RuntimeException("spring IOC Container is already exists " + beanDefinitionMap.get(value));
                            }
                            beanDefinition.setClazz(clazz);
                            beanDefinition.setBeanName(value);
                            //保存到bean定义
                            beanDefinitionMap.put(value,beanDefinition);

                            //获取到该类实现的所有接口
                            Class[] interfaces = clazz.getInterfaces();
                            //在beanDefinitionMap中存储为一个接口对应一个实现类
                            for (Class anInterface : interfaces) {
                                String interfaceSimpleName = anInterface.getSimpleName();
                                interfaceSimpleName = interfaceSimpleName.valueOf(interfaceSimpleName.charAt(0)).toLowerCase() + interfaceSimpleName.substring(1);
                                beanDefinitionMap.put(interfaceSimpleName,beanDefinition);
                            }
                        }

                    }

                } catch (ClassNotFoundException e) {
                    throw new RuntimeException(e);
                }

            }
        }
        else {
            loadAllClass(beanFactory, file);
        }
    }
}
5.ClassPathXmlApplicationContext类
常见的,我们需要读取xml文件
比如component-scan属性
参考官方源码:
在源码中还有考虑到许多,比如获取到spring XML配置文件的地址,配置它的环境,设置成员属性等,这里我们只是实现一个简单的spring,不考虑这么多。
首先创建一个bean工厂BeanFactory(),默认实现是DefaultListableBeanFactory。初始化spring容器中的refresh()方法中,会调用obtainFreshBeanFactory()方法,设置工厂的一些属性,obtainFreshBeanFactory()方法其中调用loadBeanDefinition方法,这里是读取xml配置文件,所以就通过XmlBeanDefinitionReader进行Bean定义信息的读取。
代码如下:
package com.dreams.springframework.context;

import com.dreams.springframework.beans.factory.config.ConfigurableListableBeanFactory;
import com.dreams.springframework.beans.factory.config.DefaultListableBeanFactory;
import com.dreams.springframework.beans.factory.xml.XmlBeanDefinitionReader;


/**
 * @author PoemsAndDreams
 */
public class ClassPathXmlApplicationContext {

    private ConfigurableListableBeanFactory beanFactory = new DefaultListableBeanFactory();

    private String configResources;

    public ClassPathXmlApplicationContext(String configResources) {
        this.configResources = configResources;
        //初始化spring容器
        refresh();
    }

    private void refresh() {

        // obtainFreshBeanFactory 加载spring入口
        obtainFreshBeanFactory();

        //实例化Bean
        beanFactory.createBeanInstance();
    }


    private void obtainFreshBeanFactory() {

        //加载xml配置文件
        loadBeanDefinitions(beanFactory);
    }

    private void loadBeanDefinitions(ConfigurableListableBeanFactory beanFactory) {
        XmlBeanDefinitionReader xmlBeanDefinitionReader = new XmlBeanDefinitionReader();
        xmlBeanDefinitionReader.loadBeanDefinitions(beanFactory,configResources);
    }


    public Object getBean(String beanName){
        return beanFactory.getBean(beanName);
    }

    public Object getBean(Class<?> clazz) {
        return beanFactory.getBean(clazz);
    }

}
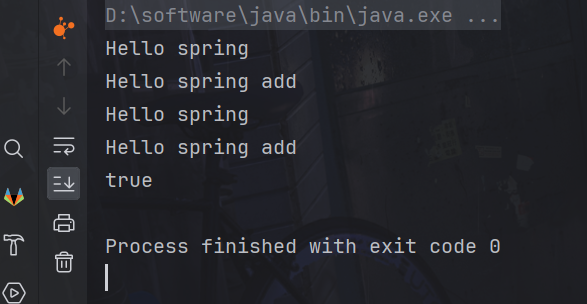
6.测试
新建一个模块UseSpring来测试功能,spring模块是上述我们写的代码的模块
引入我们写的spring项目依赖,这样就可以使用我们自己写的代码了
<dependency>
<groupId>com.dreams</groupId>
<artifactId>spring</artifactId>
<version>1.0-SNAPSHOT</version>
<scope>compile</scope>
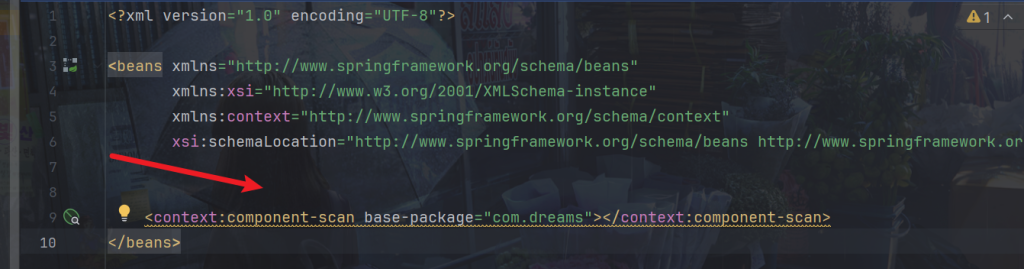
</dependency>在resources加入新建applicationContext.xml
<?xml version="1.0" encoding="UTF-8"?>

<!--以下为spring格式校验链接,引入可以对xml格式校验-->

<!--<beans xmlns="http://www.springframework.org/schema/beans"-->
<!-- xmlns:xsi="http://www.w3.org/2001/XMLSchema-instance"-->
<!-- xmlns:context="http://www.springframework.org/schema/context"-->
<!-- xsi:schemaLocation="http://www.springframework.org/schema/beans http://www.springframework.org/schema/beans/spring-beans.xsd http://www.springframework.org/schema/context https://www.springframework.org/schema/context/spring-context.xsd">-->

<!--spring的xml格式校验链接结束-->

<!-- 获取扫描包路径,spring的xml需要加入context:,我们自己实现的spring就不需要加-->
<!-- <context:component-scan base-package="com.dreams"></context:component-scan>-->

    <component-scan base-package="com.dreams"></component-scan>
<!--</beans>-->
在UserController
package com.dreams.controller;

import com.dreams.service.impl.UserServiceImpl;
import com.dreams.springframework.stereotype.Autowired;
import com.dreams.springframework.stereotype.Controller;

/**
 * @author PoemsAndDreams
 */
@Controller(value = "uc")
public class UserController {
    @Autowired
    UserServiceImpl userService;

    public void test(){
        userService.test();
    }
}
在UserService
package com.dreams.service;

/**
 * @author PoemsAndDreams
 */
public interface UserService {
    void test();
}
在UserServiceImpl
package com.dreams.service.impl;

import com.dreams.Dao.UserDao;
import com.dreams.service.UserService;
import com.dreams.springframework.stereotype.Autowired;
import com.dreams.springframework.stereotype.Service;

/**
 * @author PoemsAndDreams
 */
@Service
public class UserServiceImpl implements UserService {

    @Autowired
    UserDao userDao;


    @Override
    public void test() {
        userDao.test();
    }
}
UserDao
package com.dreams.Dao;

/**
* @author PoemsAndDreams
*/
public interface UserDao {
    void test();
}
UserDaoImpl
package com.dreams.Dao.Impl;

import com.dreams.Dao.UserDao;
import com.dreams.springframework.stereotype.Repository;

/**
 * @author PoemsAndDreams
 */
@Repository
public class UserDaoImpl implements UserDao {
    @Override
    public void test() {
        System.out.println("Hello spring");
    }
}
在test
import com.dreams.controller.UserController;
import com.dreams.springframework.context.ClassPathXmlApplicationContext;
/**
* @author PoemsAndDreams
*/
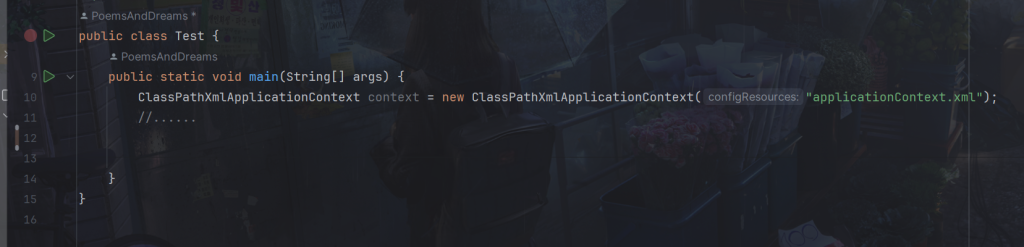
public class Test {
public static void main(String[] args) {
ClassPathXmlApplicationContext context = new ClassPathXmlApplicationContext("applicationContext.xml");
//......
UserController userController = (UserController) context.getBean("uc");
userController.test();
UserController userController1 = (UserController) context.getBean(UserController.class);
userController1.test();
System.out.println(userController1 == userController);
}
}运行如图