代码、内容参考来自于包括《操作系统真象还原》、《一个64位操作系统的设计与实现》以及《ORANGE’S:一个操作系统的实现》。
一个操作系统还要支持应用程序,也就是用户进程。
1.实现exec
exec会把一个可执行文件的绝对路径作为参数, 把当前正在运行的用户进程的进程体(代码段、 数据段、 堆、 栈)用该可执行文件的进程体替换,从而实现了新进程的执行。 注意,exec只是用新进程的进程体替换老进程进程体, 因此新进程的pid依然是老进程pid。
这里要实现的是execv,失败后返回-1,成功后不返回,因为jmp过去之后一去不复返了
新建/userprog/exec.c
#include "exec.h"
#include "thread.h"
#include "stdio-kernel.h"
#include "fs.h"
#include "string.h"
#include "global.h"
#include "memory.h"

extern void intr_exit(void);

typedef uint32_t Elf32_Word, Elf32_Addr, Elf32_Off;
typedef uint16_t Elf32_Half;

/* 32位elf头 */
struct Elf32_Ehdr {
    unsigned char e_ident[16];
    Elf32_Half e_type;
    Elf32_Half e_machine;
    Elf32_Word e_version;
    Elf32_Addr e_entry;
    Elf32_Off e_phoff;
    Elf32_Off e_shoff;
    Elf32_Word e_flags;
    Elf32_Half e_ehsize;
    Elf32_Half e_phentsize;
    Elf32_Half e_phnum;
    Elf32_Half e_shentsize;
    Elf32_Half e_shnum;
    Elf32_Half e_shstrndx;
};

/* 程序头表Program header.就是段描述头 */
struct Elf32_Phdr {
    Elf32_Word p_type;         // 见下面的enum segment_type
    Elf32_Off p_offset;
    Elf32_Addr p_vaddr;
    Elf32_Addr p_paddr;
    Elf32_Word p_filesz;
    Elf32_Word p_memsz;
    Elf32_Word p_flags;
    Elf32_Word p_align;
};

/* 段类型 */
enum segment_type {
    PT_NULL,            // 忽略
    PT_LOAD,            // 可加载程序段
    PT_DYNAMIC,         // 动态加载信息
    PT_INTERP,          // 动态加载器名称
    PT_NOTE,            // 一些辅助信息
    PT_SHLIB,           // 保留
    PT_PHDR             // 程序头表
};

/* 将文件描述符fd指向的文件中,偏移为offset,大小为filesz的段加载到虚拟地址为vaddr的内存 */
static bool segment_load(int32_t fd, uint32_t offset, uint32_t filesz, uint32_t vaddr) {
    uint32_t vaddr_first_page = vaddr & 0xfffff000;    // vaddr地址所在的页框
    uint32_t size_in_first_page = PG_SIZE - (vaddr & 0x00000fff);     // 加载到内存后,文件在第一个页框中占用的字节大小
    uint32_t occupy_pages = 0;
    /* 若一个页框容不下该段 */
    if (filesz > size_in_first_page) {
        uint32_t left_size = filesz - size_in_first_page;
        occupy_pages = DIV_ROUND_UP(left_size, PG_SIZE) + 1;         // 1是指vaddr_first_page
    } else {
        occupy_pages = 1;
    }

    /* 为进程分配内存 */
    uint32_t page_idx = 0;
    uint32_t vaddr_page = vaddr_first_page;
    while (page_idx < occupy_pages) {
        uint32_t *pde = pde_ptr(vaddr_page);
        uint32_t *pte = pte_ptr(vaddr_page);

        /* 如果pde不存在,或者pte不存在就分配内存.
         * pde的判断要在pte之前,否则pde若不存在会导致
         * 判断pte时缺页异常 */
        if (!(*pde & 0x00000001) || !(*pte & 0x00000001)) {
            if (get_a_page(PF_USER, vaddr_page) == NULL) {
                return false;
            }
        } // 如果原进程的页表已经分配了,利用现有的物理页,直接覆盖进程体
        vaddr_page += PG_SIZE;
        page_idx++;
    }
    sys_lseek(fd, offset, SEEK_SET);
    sys_read(fd, (void *) vaddr, filesz);
    return true;
}

/* 从文件系统上加载用户程序pathname,成功则返回程序的起始地址,否则返回-1 */
static int32_t load(const char *pathname) {
    int32_t ret = -1;
    struct Elf32_Ehdr elf_header;
    struct Elf32_Phdr prog_header;
    memset(&elf_header, 0, sizeof(struct Elf32_Ehdr));

    int32_t fd = sys_open(pathname, O_RDONLY);
    if (fd == -1) {
        return -1;
    }

    if (sys_read(fd, &elf_header, sizeof(struct Elf32_Ehdr)) != sizeof(struct Elf32_Ehdr)) {
        ret = -1;
        goto done;
    }

    /* 校验elf头 */
    if (memcmp(elf_header.e_ident, "\177ELF\1\1\1", 7) \
 || elf_header.e_type != 2 \
 || elf_header.e_machine != 3 \
 || elf_header.e_version != 1 \
 || elf_header.e_phnum > 1024 \
 || elf_header.e_phentsize != sizeof(struct Elf32_Phdr)) {
        ret = -1;
        goto done;
    }

    Elf32_Off prog_header_offset = elf_header.e_phoff;
    Elf32_Half prog_header_size = elf_header.e_phentsize;

    struct task_struct *cur = running_thread();

    /* 遍历所有程序头 */
    uint32_t prog_idx = 0;
    while (prog_idx < elf_header.e_phnum) {
        memset(&prog_header, 0, prog_header_size);

        /* 将文件的指针定位到程序头 */
        sys_lseek(fd, prog_header_offset, SEEK_SET);

        /* 只获取程序头 */
        if (sys_read(fd, &prog_header, prog_header_size) != prog_header_size) {
            ret = -1;
            goto done;
        }

        /* 如果是可加载段就调用segment_load加载到内存 */
        if (PT_LOAD == prog_header.p_type) {
            if (!segment_load(fd, prog_header.p_offset, prog_header.p_filesz, prog_header.p_vaddr)) {
                ret = -1;
                goto done;
            }
            //初始化进程自己的内存块描述 符,如果没这句代码的话,此处继承的是父进程的块描述符,子进程分配内存时会导致缺页异常。
            block_desc_init(cur->u_block_desc);
        }

        /* 更新下一个程序头的偏移 */
        prog_header_offset += elf_header.e_phentsize;
        prog_idx++;
    }
    ret = elf_header.e_entry;
    done:
    sys_close(fd);
    return ret;
}

/* 用path指向的程序替换当前进程 */
int32_t sys_execv(const char *path, const char *argv[]) {
    uint32_t argc = 0;
    while (argv[argc]) {
        argc++;
    }
    int32_t entry_point = load(path);
    if (entry_point == -1) {     // 若加载失败则返回-1
        return -1;
    }

    struct task_struct *cur = running_thread();
    /* 修改进程名 */
    memcpy(cur->name, path, TASK_NAME_LEN);
    cur->name[TASK_NAME_LEN - 1] = 0;

    struct intr_stack *intr_0_stack = (struct intr_stack *) ((uint32_t) cur + PG_SIZE - sizeof(struct intr_stack));
    /* 参数传递给用户进程 */
    intr_0_stack->ebx = (int32_t) argv;
    intr_0_stack->ecx = argc;
    intr_0_stack->eip = (void *) entry_point;
    /* 使新用户进程的栈地址为最高用户空间地址 */
    intr_0_stack->esp = (void *) 0xc0000000;

    /* exec不同于fork,为使新进程更快被执行,直接从中断返回 */
    asm volatile ("movl %0, %%esp; jmp intr_exit" : : "g" (intr_0_stack) : "memory");
    return 0;
}
segment_load函数接受4个参数,文件描述符fd、段在文件中的字节偏移量offset、段大小filesz、段被加载到的虚拟地址vaddr,函数功能是将文件描述符fd指向的文件中,偏移为offset,大小为filesz的段加载到虚拟地址为vaddr的内存空间。
将段加载到内存,其实就是我们平时所说的操作系统为用户进程分配内存。程序是由多个段组成的,因此这里按段来处理,分别为每个可加载的段分配内存,内存分配时采用页框粒度。变量vaddr_first_page用于获取虚拟地址vaddr所在的页框起始地址。
这种段并未占用完整的自然页,因此要根据段中此部分的尺寸计算出段中其余的尺寸将占用的页框数,将此部分占用的1页框与剩余部分占用的页框数加起来才是该段实际需要的页框总数。按照这种思路,变量size_in_first_page就表示文件在第一个页框中占用的字节大小,变量occupy_pages表示该段占用的总页框数。
if (filesz > size_in_first_page)判断,如果段大小filesz大于size_in_first_page,这表示一个页框容不下该段,下面计算该段占用的页框数并赋值给occupy_pages。如果段比较小,一个页框可以容纳该段,就将 occupy_pages 置为 1。
exec是执行新进程,也就是用新进程的进程体替换当前老进程,但依然用的是老进程的那套页表,这就涉及到老进程的页表是否满足新进程内存要求了。如果老进程已经分配了页框,我们不需要再重新分配页框,只需要用新进程的进程体覆盖老进程就行了,只有新进程用到了在老进程中没有的地址时才需要分配新页框给新进程。
因此分别获取新进程虚拟地址vaddr_page的pde和pte。if (!(*pde & 0x00000001) || !(*pte & 0x00000001))判断如果该虚拟地址在老进程中未分配,就调用get_a_page分配内存。接着更新为下一虚拟页,回到循环开头继续处理。把段所需要的内存分配好后,下面是从文件系统上加载用户进程到刚刚分配好的内存中,先通过sys_lseek函数将文件指针定位到段在文件中的偏移地址,然后将该段读入到虚拟地址 vaddr 处。自此,一个段被加载到了内存。
load函数接受1个参数,可执行文件的绝对路径pathname,功能是从文件系统上加载用户程序pathname,成功则返回程序的起始地址,否则返回-1。
函数开头先定义了elf头elf_header和程序头prog_header,读取可执行文件的elf 头到 elf_header。
if (memcmp(elf_header.e_ident, “\177ELF\1\1\1”, 7)……开始校验 elf头,判断加载的文件是否是 elf格式的。
elf头的e_ident字段是elf格式的魔数,它是个16字节的数组,e_ident[7~15]暂时未用,因此只需要检测e_ident[0~6]这七个成员。开头的4个字节是固定不变的,它们分别是0x7f和字符串”ELF”的asc码0x45、0x4c和0x46。成员e_ident[4]表示elf是32位,还是64位,值为1表示32位,值为2表示64位。e_ident[5]表示字节序,值为1表示小端字节序,值为2表示大端字节序。eident[6]表示elf版本信息,默认为1,以上e_ident[4-6]值为0均表示非法、不可识别,在8086平台上开发,它是小端字节序,并且是32位系统,因此这三位值均取1,故e_ident[0-6]应该分别等于十六进制0x7F、0x45、0x4C、0x46、0x1、0x1和0x1。
通过memcmp函数比对elf头中的e_ident魔数,其中”\177″是八进制,十六进制为0x7f,是e_ident[0]的固定值。
e_type表示目标文件类型,其值应该为ET_EXEC,即等于2。e_machine表示体系结构,其值应该为 EM_386,即等于3。e_version表示版本信息,其值应该为1。 e_phnum用来指明程序头表中条目的数量,也就 是段的个数,基值应该小于等于1024。e_phentsize用来指明程序头表中每个条目的字节大小,也就是每个用来 描述段信息的数据结构的字节大小,该结构就是struct Elf32_Phdr,因此值应该为sizeof (struct Elf32_Phdr)。 因此,如果不满足任意条件,则认为该文件不是elf文件,于是就将返回值ret置为-1,跳 到标号done处,执行”sys_close(fd)”关闭打开的新可执行文件,然后返回ret的值。
程序头的起始地址记录在e_phoff中,将其获取到变量prog_header_offset。程序头条目大小记录在 e_phentsize中,将其获取到变量prog_header_size中。下面while (prog_idx < elf_header.e_phnum) 在程序头表中遍历所有程序头。
程序头即段头,段的数量在e_phnum中记录,while循环处理e_phnum个段信息。sys_lseek(fd, prog_header_offset, SEEK_SET)通过sys_lseek将文件的指针定位到程序头,if (sys_read(fd, &prog_header, prog_header_size) != prog_header_size)读取段信息到prog_header中。if (PT_LOAD == prog_header.p_type)判断段的类型,如果该段是PT_LOAD,即可加载的段,那么就调用函数segment_load为该段分配内存,从文件系统中加载到内存。循环处理完所有段后,将程序的入口,即e_entry作为返回值赋值给ret,随后关闭可执行文件并返回,至此load函数结束。
sys_execv函数接受2个参数,path 是可执行文件的绝对路径,数组argv 是传给可执行文件的参数,函数功能是用path指向的程序替换当前进程。函数失败则返回-1,如果成功则没机会返回,因此”return 0″只是为满足编译器gcc的c语法
while (argv[argc]) 通过while循环,统计出参数个数,存放到变量argc中。
通过”block_desc_init(child_thread->u_block_desc) “初始化进程自己的内存块描述符,如果没这句代码的话,此处继承的是父进程的块描述符,子进程分配内存时会导致缺页异常。
然后调用load加载文件path,成功后,需要修改内核栈中的参数。先将pcb中的name更新为进程名,这样执行ps时便会看到正在执行的命令,其中TASK_NAME_LEN就是pcb中的name数组长度,其值为16,通过宏的方式重新在thread.h中定义了。
修改thread/thread.c,添加该宏
#define TASK_NAME_LEN 16
回到sys_execv函数
然后在struct intr_stack* intr_0_stack = (struct intr_stack*)((uint32_t)cur + PG_SIZE – sizeof(struct intr_stack))获得内核栈的地址,此内核栈中的数据还属于老进程,我们一会要利用该栈从intr_exit返回,因此接下来修改栈中的数据为新进程。首先将参数数组argv的地址赋值给栈中ebx寄存器,参数个数argc赋值给栈中ecx寄存器,新进程从intr_exit返回后才是第一次运行,因此运行之初通用寄存器中的值都是无效的,只有运行之后寄存器中的值才是有意义的,故argc和argv其实放在哪两个通用寄存器中都可以,这里分别将它们放在ebx和ecx的原因是: ebx经常做基址寄存器,argv本来就是所有参数的基地址, ecx经常做循环控制次数寄存器, argc本来就是argv的参数个数,也就是循环次数,现在把参数放在哪个寄存器中,将来在获取参数时就从哪些寄存器中取。
接着intr_0_stack->eip = (void*)entry_point将可执行文件的入口地址赋值给栈中eip寄存器。然后将内核栈中的用户栈指针esp恢复为0xc0000000,这样做的原因有两个,一是老进程用户栈中的数据只适用于老进程,对新进程没用,故新进程的用户栈应该从新开始。二是为了后续传入参数做准备,用户空间的最高处用于存储命令行参数。
接着通过内联汇编,将新进程内核栈地址赋值给esp寄存器,然后跳转到intr_exit,假装从中断返回,实现了新进程的运行。
修改/userprog/syscall-init.c,加入注册
syscall_table[SYS_EXECV] = sys_execv;
/lib/user/syscall.c
int execv(const char* pathname, char** argv) {
   return _syscall2(SYS_EXECV, pathname, argv);
}
/lib/user/syscall.h
enum SYSCALL_NR {
    SYS_GETPID,
    SYS_WRITE,
    SYS_MALLOC,
    SYS_FREE,
    SYS_FORK,
    SYS_READ,
    SYS_PUTCHAR,
    SYS_CLEAR,
    SYS_GETCWD,
    SYS_OPEN,
    SYS_CLOSE,
    SYS_LSEEK,
    SYS_UNLINK,
    SYS_MKDIR,
    SYS_OPENDIR,
    SYS_CLOSEDIR,
    SYS_CHDIR,
    SYS_RMDIR,
    SYS_READDIR,
    SYS_REWINDDIR,
    SYS_STAT,
    SYS_PS,
    SYS_EXECV
};
int execv(const char* pathname, char** argv);
Linux执行外部命令时bash会fork出子进程并调用exec从磁盘上加载外部命令对应的程序,然后执行该程序,从而实现了外部命令的执行。
修改shell/shell.c
/* 简单的shell */
void my_shell(void) {
    cwd_cache[0] = '/';
    while (1) {
        print_prompt();
        memset(final_path, 0, MAX_PATH_LEN);
        memset(cmd_line, 0, MAX_PATH_LEN);
        readline(cmd_line, MAX_PATH_LEN);
        if (cmd_line[0] == 0) {  // 若只键入了一个回车
            continue;
        }

        argc = -1;
        argc = cmd_parse(cmd_line, argv, ' ');
        if (argc == -1) {
            printf("num of arguments exceed %d\n", MAX_ARG_NR);
            continue;
        }
        if (!strcmp("ls", argv[0])) {
            buildin_ls(argc, argv);
        } else if (!strcmp("cd", argv[0])) {
            if (buildin_cd(argc, argv) != NULL) {
                memset(cwd_cache, 0, MAX_PATH_LEN);
                strcpy(cwd_cache, final_path);
            }
        } else if (!strcmp("pwd", argv[0])) {
            buildin_pwd(argc, argv);
        } else if (!strcmp("ps", argv[0])) {
            buildin_ps(argc, argv);
        } else if (!strcmp("clear", argv[0])) {
            buildin_clear(argc, argv);
        } else if (!strcmp("mkdir", argv[0])){
            buildin_mkdir(argc, argv);
        } else if (!strcmp("rmdir", argv[0])){
            buildin_rmdir(argc, argv);
        } else if (!strcmp("rm", argv[0])) {
            buildin_rm(argc, argv);
        } else {      // 如果是外部命令,需要从磁盘上加载
            int32_t pid = fork();
            if (pid) {     // 父进程
                /* 下面这个while必须要加上,否则父进程一般情况下会比子进程先执行,
                因此会进行下一轮循环将findl_path清空,这样子进程将无法从final_path中获得参数*/
                while(1);
            } else {       // 子进程
                make_clear_abs_path(argv[0], final_path);
                argv[0] = final_path;
                /* 先判断下文件是否存在 */
                struct stat file_stat;
                memset(&file_stat, 0, sizeof(struct stat));
                if (stat(argv[0], &file_stat) == -1) {
                    printf("my_shell: cannot access %s: No such file or directory\n", argv[0]);
                } else {
                    execv(argv[0], argv);
                }
                while(1);
            }
        }
        int32_t arg_idx = 0;
        while(arg_idx < MAX_ARG_NR) {
            argv[arg_idx] = NULL;
            arg_idx++;
        }
    }
    panic("my_shell: should not be here");
}
当前的进程shell先fork出子进程,接着在父进程中通过while(1)死循环使父进程悬停,在子进程中,先调用make_clear_abs_path获取可执行文件argv[0]的绝对路径到final_path中,然后将 argv[0]重新指向final_path。接着调用系统调用stat判断可执行文件是否存在,如果存在,则执行系统调用 execv 去执行该可执行文件。参数数组argv是由readline函数维护的,它会覆盖argv,并且参数个数是由argc来保证的,也不会出现越界的情况。
2.支持无参数进程
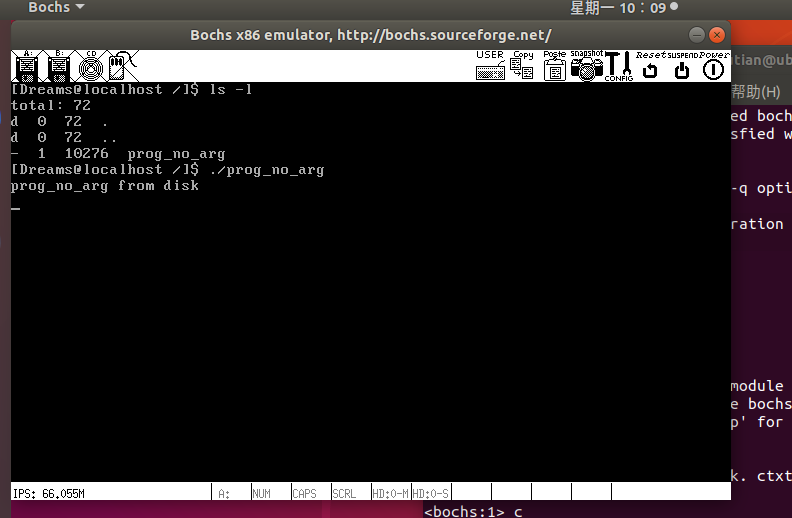
接下来就是写个用户进程测试一下:
新建/command/prog_no_arg.c
#include "stdio.h"
int main(void) {
  printf("prog_no_arg from disk\n");
  while(1);
  return 0;
}
我们的系统还没有能够自己加载进程到磁盘
所以暂时写个脚本写入
/command/compile.sh
#!/bin/bash

if [[ ! -d "../lib" || ! -d "../build" ]];then
   echo "dependent dir don\`t exist!"
   cwd=$(pwd)
   cwd=${cwd##*/}
   cwd=${cwd%/}
   if [[ $cwd != "command" ]];then
      echo -e "you\`d better in command dir\n"
   fi
   exit
fi
CC="gcc"
BIN="prog_no_arg"
CFLAGS="-Wall -c -fno-builtin -W -Wstrict-prototypes \
      -Wmissing-prototypes -Wsystem-headers -m32 -fno-stack-protector"
LIB="../lib/"
OBJS="../build/string.o ../build/syscall.o \
      ../build/stdio.o ../build/assert.o"
DD_IN=$BIN
DD_OUT="/bochs/bin/dreams.img"

$CC $CFLAGS -I $LIB -o $BIN".o" $BIN".c"
ld -e main $BIN".o" $OBJS -o $BIN -m elf_i386
SEC_CNT=$(ls -l $BIN|awk '{printf("%d", ($5+511)/512)}')

if [[ -f $BIN ]];then
   dd if=./$DD_IN of=$DD_OUT bs=512 \
   count=$SEC_CNT seek=300 conv=notrunc
fi

##########   以上核心就是下面这三条命令   ##########
#gcc -Wall -c -fno-builtin -W -Wstrict-prototypes -Wmissing-prototypes \
#   -Wsystem-headers -I ../lib -o prog_no_arg.o prog_no_arg.c
#ld -e main prog_no_arg.o ../build/string.o ../build/syscall.o\
#   ../build/stdio.o ../build/assert.o -o prog_no_arg
#dd if=prog_no_arg of=/bochs/bin/dreams.img \
#   bs=512 count=10 seek=300 conv=notrunc
而后先要将dreams.img上的程序读出来,再通过文件系统函数写入dreamsFS.img中。
在 main.c中加入了读取prog_no_arg的代码
#include "print.h"
#include "init.h"
#include "thread.h"
#include "interrupt.h"
#include "console.h"
#include "process.h"
#include "syscall-init.h"
#include "syscall.h"
#include "stdio.h"
#include "memory.h"
#include "dir.h"
#include "fs.h"
#include "assert.h"
#include "shell.h"

#include "ide.h"
#include "stdio-kernel.h"

void init(void);

int main(void) {
   put_str("I am kernel\n");
   init_all();

/*************    写入应用程序    *************/
   uint32_t file_size = 10276;
   uint32_t sec_cnt = DIV_ROUND_UP(file_size, 512);
   struct disk* sda = &channels[0].devices[0];
   void* prog_buf = sys_malloc(file_size);
   ide_read(sda, 300, prog_buf, sec_cnt);
   int32_t fd = sys_open("/prog_no_arg", O_CREAT|O_RDWR);
   if (fd != -1) {
      if(sys_write(fd, prog_buf, file_size) == -1) {
     printk("file write error!\n");
     while(1);
      }
   }
/*************    写入应用程序结束   *************/
   cls_screen();
   console_put_str("[rabbit@localhost /]$ ");
   while(1);
   return 0;
}

/* init进程 */
void init(void) {
   uint32_t ret_pid = fork();
   if(ret_pid) {  // 父进程
      while(1);
   } else {   // 子进程
      my_shell();
   }
   panic("init: should not be here");
}
注释围起来是本次写入文件的代码,在文件写入之后就没用了,下次再运行时记得注释掉。
由于这个程序复用了printf,而printf调用了vsprintf,而vsprintf调用了strcpy,而strcpy调用了ASSERT宏,而ASSERT使用了PANIC,而PANIC使用了panic_spin,而panic_spin使用了,intr_disable()。也就是说,我们调用用户态printf的程序,如果中间strcpy的ASSERT出错,将会直接在用户态调用intr_disable,这是绝对不能允许的,运行会报特权级保护错误!正确的做法是,先通过系统调用切换至内核态,然后再调用intr_disable。
所以,我们先实现用户态使用的assert
新建/lib/user/assert.c
#include "assert.h"
#include "stdio.h"
void user_spin(char* filename, int line, const char* func, const char* condition) {
   printf("\n\n\n\nfilename %s\nline %d\nfunction %s\ncondition %s\n", filename, line, func, condition);
   while(1);
}
对应/lib/user/assert.h
#ifndef __LIB_USER_ASSERT_H
#define __LIB_USER_ASSERT_H

#define NULL ((void*)0)

void user_spin(char* filename, int line, const char* func, const char* condition);
#define panic(...) user_spin(__FILE__, __LINE__, __func__, __VA_ARGS__)

#ifdef NDEBUG
   #define assert(CONDITION) ((void)0)
#else
   #define assert(CONDITION)  \
      if (!(CONDITION)) {     \
     panic(#CONDITION);   \
      }

#endif/*NDEBUG*/

#endif/*__LIB_USER_ASSERT_H*/
如此一来,我们的assert判断出错,将会通过printf内的write系统调用正常进入内核态
把内核中用户态程序用到的ASSERT与PANIC都改掉
修改/lib/string.c中所有的ASSERT为assert,然后将头文件#include “debug.h”修改为#incldue “assert.h”
修改/shell/buildin_cmd.c中所有的ASSERT为assert,然后将头文件#include “debug.h”修改为#incldue “assert.h”
修改/shell/shell.c中所有的ASSERT为assert,修改所有的PANIC为panic,然后将头文件#include “debug.h”修改为#incldue “assert.h”
修改/kernel/main.c中所有的PANIC为panic,然后将头文件#include “debug.h”修改为#incldue “assert.h”
为了让prog_no_arg有.o文件可以用,先make all一下
sudo make all
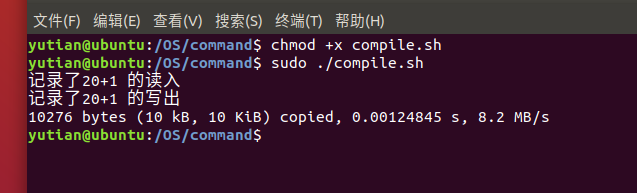
接着执行脚本
chmod +x compile.sh
sudo ./compile.sh
接着修改main文件,注释掉写入应用程序代码
再make all一次
接着执行即可
3.支持有参进程
用户进程可能还会存在参数,我们还要让它支持参数。
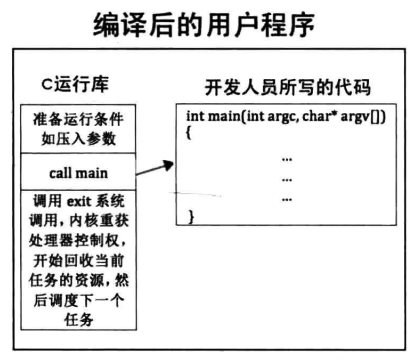
CRT,C运行库,因操作系统不同而不同,负责初始化运行环境,在main函数之前为用户进程准备条件,传递参数等,等准备好之后再调用main函数,用户进程结束时,CRT还要负责回收资源。
main函数是被call调用的
其实CRT代码才是用户程序的第一部分,我们的main函数实质上是被夹在CRT中执行的,它只是用户程序的中间部分,编译后的二进制可执行程序中还包括了CRT的指令, 其结构如图所示:
新建/command/start.S
[bits 32]
extern   main
section .text
global _start
_start:
   ;下面这两个要和execv中load之后指定的寄存器一致
   push  ebx     ;压入argv
   push  ecx      ;压入argc
   call  main
start.S是用户程序真正的第一个函数,是程序的真正入口,这是我们编译后的用户程序中的第一部分。
通过”extern main”声明了外部函数main,就是用户程序中的主函数main。
标号_start,它是链接器默认的入口符号,如果 ld 命令链接时未使用链接脚本或-e 参数指定入口符号的话,默认会以符号_start为程序入口。
在文件exec.c中我们已经把新进程的参数压入内核栈中相应的寄存器,sys_execv执行完成从intr_exit返回后,寄存器ebx是参数数组argv的地址,寄存器ecx是参数个数argc。
因此将它们压入栈,此时的栈是用户栈,在sys_execv中,往0特权级栈中哪个寄存器写入参数,此处就从哪个寄存器中获取参数,然后再压入用户栈为用户进程准备参数。
通过call指令调用外部函数 main,也就是用户程序开发人员所负责的主函数main,用户程序的主函数开始运行。
接下来就是写个用户进程测试一下:
新建/command/prog_arg.c
#include "stdio.h"
#include "syscall.h"
#include "string.h"
int main(int argc, char** argv) {
   int arg_idx = 0;
   while(arg_idx < argc) {
      printf("argv[%d] is %s\n", arg_idx, argv[arg_idx]);
      arg_idx++;
   }
   int pid = fork();
   if (pid) {
      int delay = 900000;
      while(delay--);
      printf("\n      I`m father prog, my pid:%d, I will show process list\n", getpid());
      ps();
   } else {
      char abs_path[512] = {0};
      printf("\n      I`m child prog, my pid:%d, I will exec %s right now\n", getpid(), argv[1]);
      if (argv[1][0] != '/') {
     getcwd(abs_path, 512);
     strcat(abs_path, "/");
     strcat(abs_path, argv[1]);
     execv(abs_path, argv);
      } else {
     execv(argv[1], argv);
      }
   }
   while(1);
   return 0;
}
我们的系统还没有能够自己加载进程到磁盘
所以暂时写个脚本写入
/command/compile.sh
#!/bin/bash

if [[ ! -d "../lib" || ! -d "../build" ]];then
   echo "dependent dir don\`t exist!"
   cwd=$(pwd)
   cwd=${cwd##*/}
   cwd=${cwd%/}
   if [[ $cwd != "command" ]];then
      echo -e "you\`d better in command dir\n"
   fi
   exit
fi
CC="gcc"
BIN="prog_arg"
CFLAGS="-Wall -c -fno-builtin -W -Wstrict-prototypes \
    -Wmissing-prototypes -Wsystem-headers -m32 -fno-stack-protector"
LIBS="-I ../lib -I ../lib/user -I ../fs -I ../thread -I ../lib/kernel -I ../kernel"
OBJS="../build/string.o ../build/syscall.o \
      ../build/stdio.o ../build/assert.o start.o"
DD_IN=$BIN
DD_OUT="/bochs/bin/dreams.img"

nasm -f elf ./start.S -o ./start.o
ar rcs simple_crt.a $OBJS start.o
$CC $CFLAGS $LIBS -o $BIN".o" $BIN".c"
ld $BIN".o" simple_crt.a -o $BIN -m elf_i386
SEC_CNT=$(ls -l $BIN|awk '{printf("%d", ($5+511)/512)}')

if [[ -f $BIN ]];then
   dd if=./$DD_IN of=$DD_OUT bs=512 \
   count=$SEC_CNT seek=300 conv=notrunc
fi

##########   以上核心就是下面这三条命令   ##########
#gcc -Wall -c -fno-builtin -W -Wstrict-prototypes -Wmissing-prototypes \
#   -Wsystem-headers -I ../lib -o prog_no_arg.o prog_no_arg.c
#ld -e main prog_no_arg.o ../build/string.o ../build/syscall.o\
#   ../build/stdio.o ../build/assert.o -o prog_no_arg
#dd if=prog_no_arg of=/bochs/bin/dreams.img \
#   bs=512 count=10 seek=300 conv=notrunc
执行这个脚本
修改main函数
#include "print.h"
#include "init.h"
#include "thread.h"
#include "interrupt.h"
#include "console.h"
#include "process.h"
#include "syscall-init.h"
#include "syscall.h"
#include "stdio.h"
#include "memory.h"
#include "dir.h"
#include "fs.h"
#include "assert.h"
#include "shell.h"
#include "ide.h"
#include "stdio-kernel.h"
void init(void);
int main(void) {
put_str("I am kernel\n");
init_all();
/************* 写入应用程序 *************/
uint32_t file_size = 10316;
uint32_t sec_cnt = DIV_ROUND_UP(file_size, 512);
struct disk* sda = &channels[0].devices[0];
void* prog_buf = sys_malloc(file_size);
ide_read(sda, 300, prog_buf, sec_cnt);
int32_t fd = sys_open("/prog_arg", O_CREAT|O_RDWR);
if (fd != -1) {
if(sys_write(fd, prog_buf, file_size) == -1) {
printk("file write error!\n");
while(1);
}
}
/************* 写入应用程序结束 *************/
cls_screen();
console_put_str("[Dreams@localhost /]$ ");
while(1);
return 0;
}
/* init进程 */
void init(void) {
uint32_t ret_pid = fork();
if(ret_pid) { // 父进程
while(1);
} else { // 子进程
my_shell();
}
panic("init: should not be here");
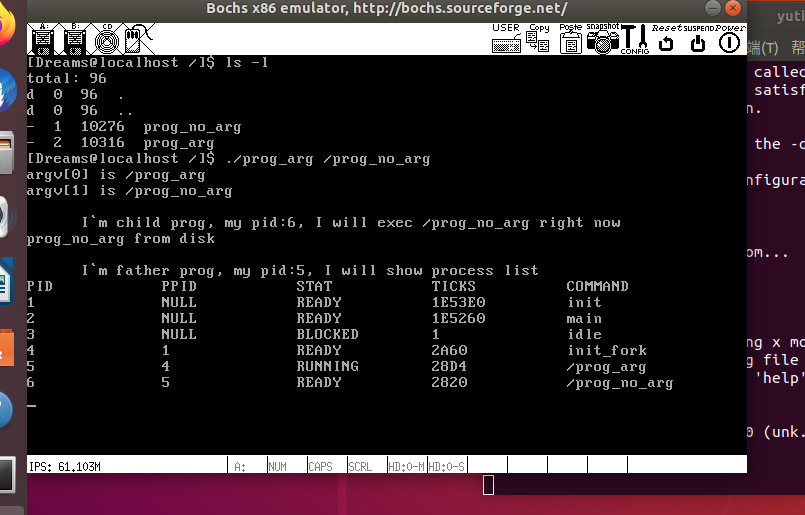
}执行结果
4.参考
郑钢著操作系统真象还原
田宇著一个64位操作系统的设计与实现
丁渊著ORANGE’S:一个操作系统的实现