代码、内容参考来自于张秀宏大佬的自己动手写Java虚拟机 (Java核心技术系列)以及尚硅谷宋红康:JVM全套教程。
编译之后的Java方法以字节码的形式存储在class文件中。
所以接下来将编写一个简单的解释器,并且实现大约150条指令。
1.字节码和指令集
- Java字节码对于虚拟机,就好像汇编语言对于计算机,属于基本执行指令。
- Java虚拟机的指令由一个字节长度的、代表着某种特定操作含义的数字(称为操作码, Opcode)以及跟随其后的零至多个代表此操作所需参数(称为操作数, Operands)而构成。由于Java虚拟机采用面向操作数栈而不是寄存器的结构,所以大多数的指令都不包含操作数,只有一个操作码。
- 由于限制了 Java 虚拟机操作码的长度为一个字节(即 0~255),这意味着指令集的操作码总数不可能超过256 条。
官方文档:Chapter 6. The Java Virtual Machine Instruction Set (oracle.com)
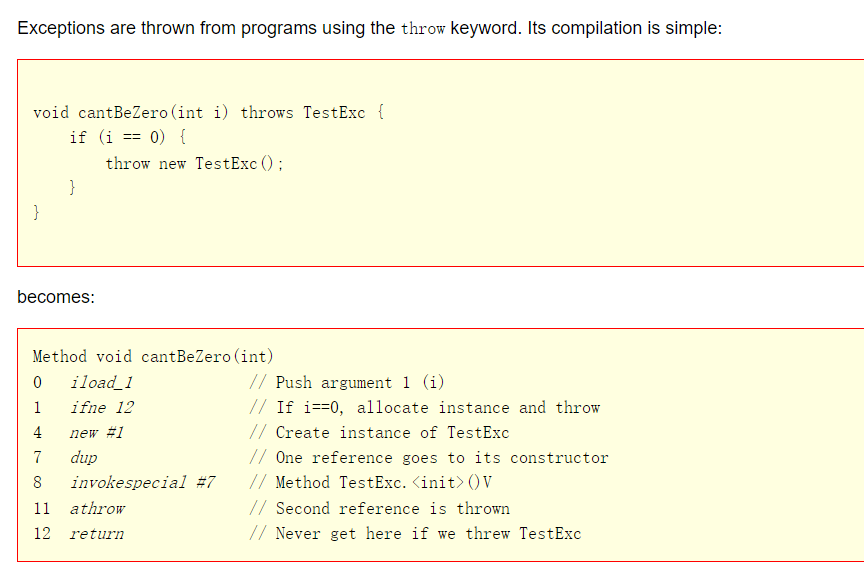
Java虚拟机顾名思义,就是一台虚拟的机器,而字节码(bytecode)就是运行在这台虚拟机器上的机器码。我们已经知道,每一个类或者接口都会被Java编译器编译成一个class文件,类或接口的方法信息就放在class文件的method_info结构中 。如果方法不是抽象的,也不是本地方法,方法的Java代码就会被编译器编译成字节码(即使方法是空的,编译器也会生成一条return语句),存放在method_info结构的Code属性中。
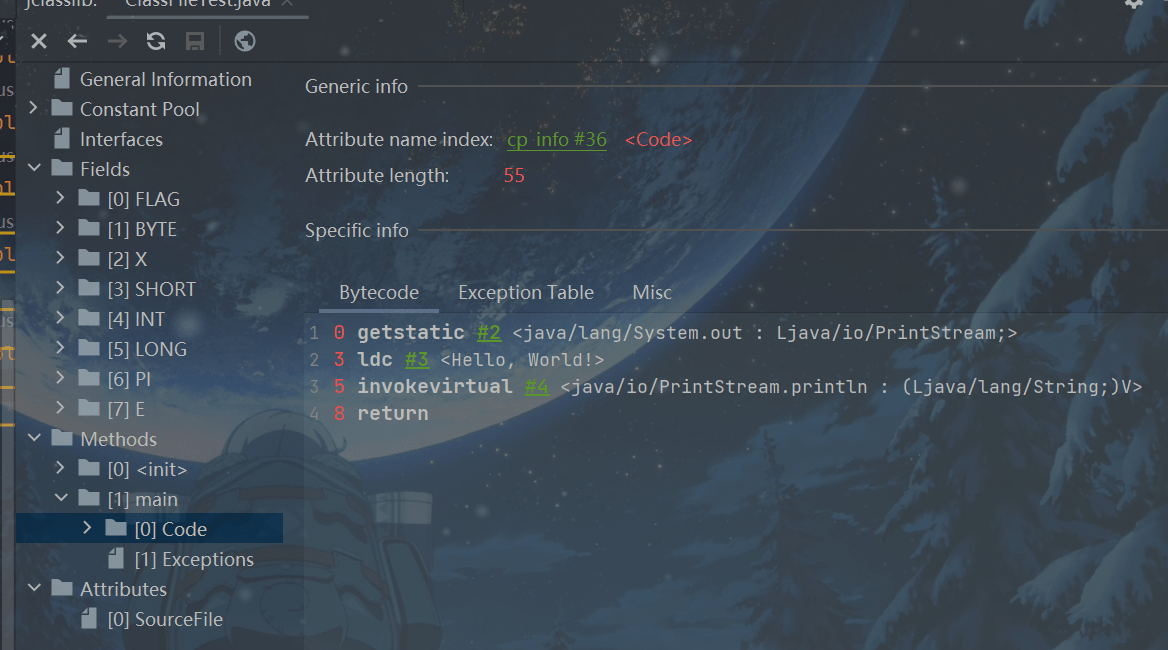
ClassFileTest类为例,其main()方法。
字节码中存放编码后的Java虚拟机指令。每条指令都以一个单字节的操作码(opcode)开头,这就是字节码名称的由来。由于只使用一字节表示操作码,显而易见,Java虚拟机最多只能支持256(2
8 )条指令。到第八版为止,Java虚拟机规范已经定义了205条指令,操作码分别是0(0x00)到202(0xCA)、254(0xFE)和255(0xFF)。这205条指令构成了Java虚拟机的指令集(instruction set)。和汇编语言类似,为了便于记忆,Java虚拟机规范给每个操作码都指定了一个助记符(mnemonic)。比如操作码是0x00这条指令,因为它什么也不做,所以它的助记符是nop(no operation)。
Java虚拟机使用的是变长指令,操作码后面可以跟零字节或多字节的操作数(operand)。如果把指令想象成函数的话,操作数就是它的参数。为了让编码后的字节码更加紧凑,很多操作码本身就隐
含了操作数,比如把常数0推入操作数栈的指令是iconst_0。
该指令的操作码是0xB2,助记符是getstatic。它的操作数是0x0002,代表常量池里的第二个常量。在第4章中讨论过,操作数栈和局部变量表只存放数据的值,并不记录数据类型。
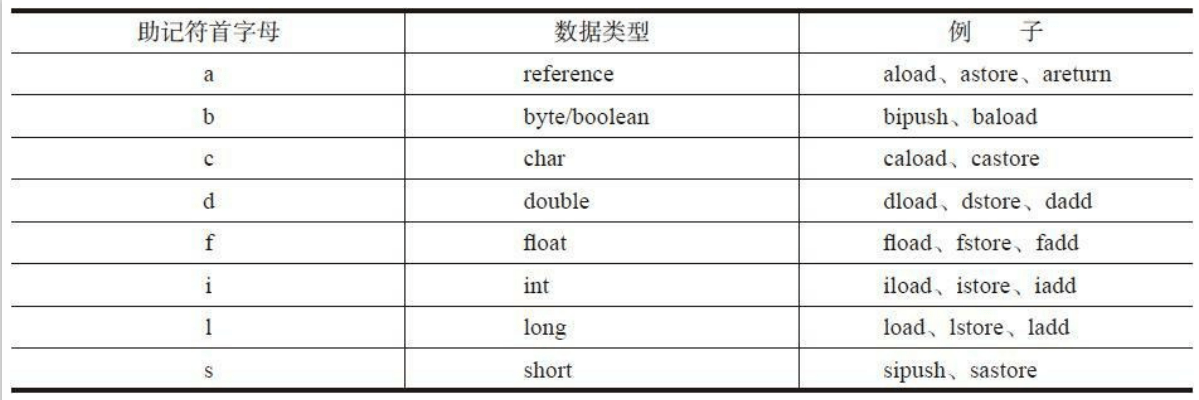
结果就是:指令必须知道自己在操作什么类型的数据。这一点也直接反映在了操作码的助记符上。例如,iadd指令就是对int值进行加法操作;dstore指令把操作数栈顶的double值弹出,存储到局部变量表中;areturn从方法中返回引用值。也就是说,如果某类指令可以操作不同类型的变量,则助记符的第一个字母表示变量类型。
在做值相关操作时:
- 一个指令,可以从局部变量表、常量池、堆中对象、方法调用、系统调用中等取得数据,这些数据(可能是值可能是对象的引用)被压入操作数栈。
- 一个指令,也可以从操作数栈中取出一到多个值(pop多次),完成赋值、加减乘除、方法传参、系统调用等等操作。
助记符首字母和变量类型的对应关系
Java虚拟机规范把已经定义的205条指令按用途分成了11类,分别是:
- 常量(constants)指令、
- 加载(loads)指令、
- 存储(stores)指令、
- 操作数栈(stack)指令、
- 数学(math)指令、
- 转换(conversions)指令、
- 比较(comparisons)指令、
- 控制(control)指令、
- 引用(references)指令、
- 扩展(extended)指令和
- 保留(reserved)指令。
保留指令一共有3条。其中一条是留给调试器的,用于实现断点,操作码是202(0xCA),助记符是breakpoint。另外两条留给Java虚拟机实现内部使用,操作码分别是254(0xFE)和266(0xFF),助记符是impdep1和impdep2。这三条指令不允许出现在class文件中。
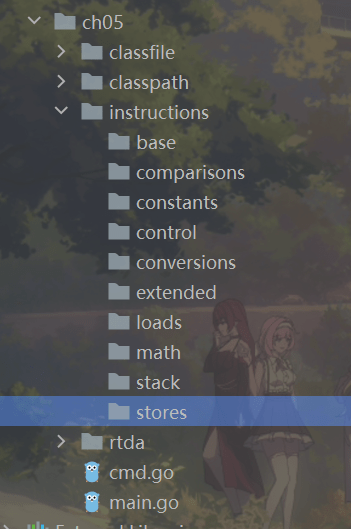
本章将要实现的指令涉及11类中的9类。在第9章讨论本地方法调用时会用到保留指令中的impdep1指令,引用指令则分布在第6、第7、第8、第10章等章节中。我们把每种指令的源文件都放在各自的包里,所有指令都共用的代码则放在base包里。
因此instructions目录下会有如下10个子目录:
2.指令和指令解码
Java虚拟机规范的2.11节介绍了Java虚拟机解释器的大致逻辑,
Chapter 2. The Structure of the Java Virtual Machine (oracle.com)
如下所示:
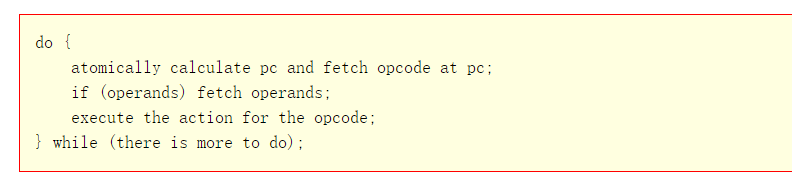
翻译:
do{
    自动计算PC寄存器的值加1;
    根据PC寄存器的指示位置,从字节码流中取出操作码;
    if(字节码存在操作数) 从字节码流中取出操作数;
    执行操作码所定义的操作;
}while(字节码长度>0);
每次循环都包含三个部分:计算pc、指令解码、指令执行。可以把这个逻辑用Go语言写成一个for循环,里面是个大大的switch-case语句。但这样的话,代码的可读性将非常差。所以采用另外一种方
式:把指令抽象成接口,解码和执行逻辑写在具体的指令实现中。
这样编写出的解释器就和Java虚拟机规范里的伪代码一样简单,代码如下:
for {
    pc := calculatePC()
    opcode := bytecode[pc]
    inst := createInst(opcode)
    inst.fetchOperands(bytecode)
    inst.execute()
}
将在5.12节编写解释器代码,在5.3~5.11节分类实现具体的指令。
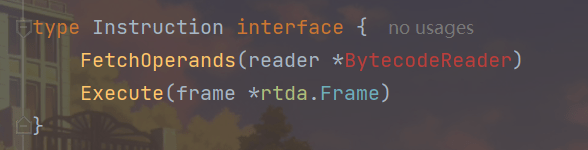
本节先定义指令接口,然后定义一个结构体用来辅助指令解码。
Instruction接口
整体代码
在instructions\base目录下创建instruction.go文件,代码如下:
package base
import "jvmgo/ch05/rtda"
type Instruction interface {
FetchOperands(reader *BytecodeReader)
Execute(frame *rtda.Frame)
}
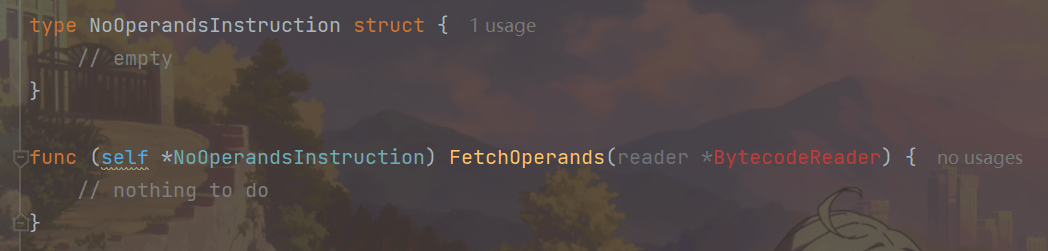
type NoOperandsInstruction struct {
// empty
}
func (self *NoOperandsInstruction) FetchOperands(reader *BytecodeReader) {
// nothing to do
}
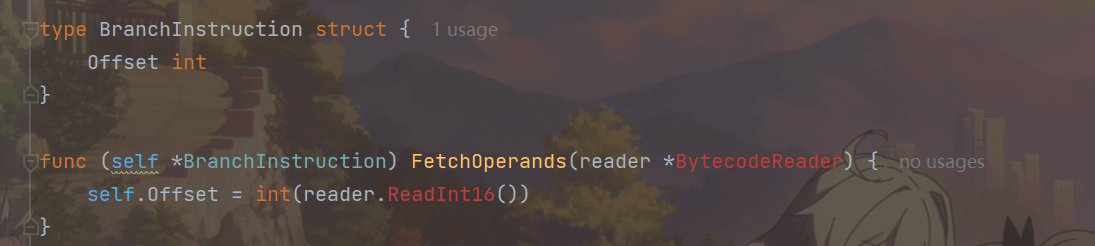
type BranchInstruction struct {
Offset int
}
func (self *BranchInstruction) FetchOperands(reader *BytecodeReader) {
self.Offset = int(reader.ReadInt16())
}
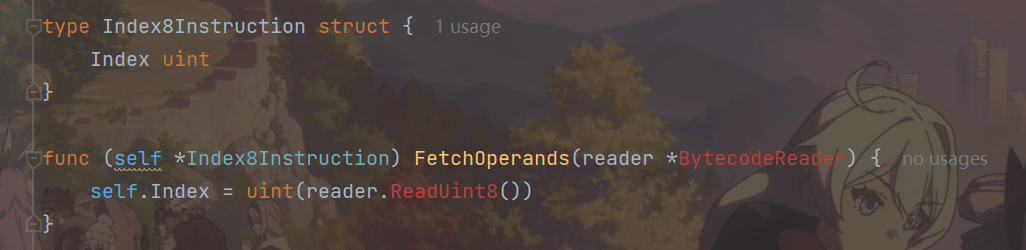
type Index8Instruction struct {
Index uint
}
func (self *Index8Instruction) FetchOperands(reader *BytecodeReader) {
self.Index = uint(reader.ReadUint8())
}
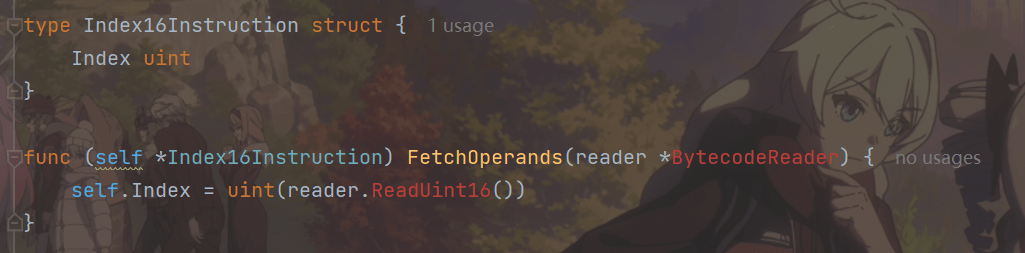
type Index16Instruction struct {
Index uint
}
func (self *Index16Instruction) FetchOperands(reader *BytecodeReader) {
self.Index = uint(reader.ReadUint16())
}代码解释
结构体
在其中定义Instruction接口:
FetchOperands()方法从字节码中提取操作数,Execute()方法执行指令逻辑。有很多指令的操作数都是类似的。为了避免重复代码,按照操作数类型定义一些结构体,并实现FetchOperands()方
法。这相当于Java中的抽象类,具体的指令继承这些结构体,然后专注实现Execute()方法即可。
NoOperandsInstruction结构体(表示没有操作数的指令)
在instruction.go文件中定义NoOperandsInstruction结构体,NoOperandsInstruction表示没有操作数的指令,所以没有定义任何字段。FetchOperands()方法自然也是空空如也,什么也不用读。
BranchInstruction结构体(表示跳转指令)
继续编辑instruction.go文件,在其中定义BranchInstruction结构体,BranchInstruction表示跳转指令,Offset字段存放跳转偏移量。FetchOperands()方法从字节码中读取一个uint16整数,转成int后赋给Offset字段。代码如下:
Index8Instruction结构体(存储和加载类指令需要根据单字节操作数索引存取局部变量表。)
继续编辑instruction.go文件,在其中定义Index8Instruction结构体,存储和加载类指令需要根据索引存取局部变量表,索引由单字节操作数给出。把这类指令抽象成Index8Instruction结构体,用Index字段表示局部变量表索引。FetchOperands()方法从字节码中读取一个int8整数,转成uint后赋给Index字段。
Index16Instruction结构体(常量池索引由两字节操作数给出)
最后在instruction.go文件中定义Index16Instruction结构体,有一些指令需要访问运行时常量池,常量池索引由两字节操作数给出。把这类指令抽象成Index16Instruction结构体,用Index字段表示常量池索引。FetchOperands()方法从字节码中读取一个uint16整数,转成uint后赋给Index字段。代码如下:
指令接口和抽象指令定义好了,下面来看BytecodeReader结构体。
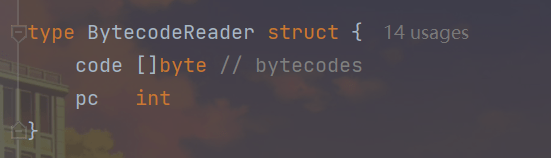
BytecodeReader
整体代码
在instructions\base目录下创建bytecode_reader.go文件,代码如下:
package base
type BytecodeReader struct {
code []byte // bytecodes
pc int
}
func (self *BytecodeReader) Reset(code []byte, pc int) {
self.code = code
self.pc = pc
}
func (self *BytecodeReader) PC() int {
return self.pc
}
func (self *BytecodeReader) ReadInt8() int8 {
return int8(self.ReadUint8())
}
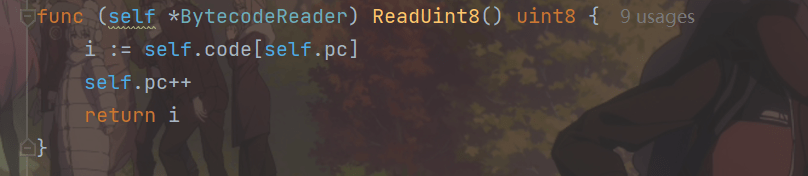
func (self *BytecodeReader) ReadUint8() uint8 {
i := self.code[self.pc]
self.pc++
return i
}
func (self *BytecodeReader) ReadInt16() int16 {
return int16(self.ReadUint16())
}
func (self *BytecodeReader) ReadUint16() uint16 {
byte1 := uint16(self.ReadUint8())
byte2 := uint16(self.ReadUint8())
return (byte1 << 8) | byte2
}
func (self *BytecodeReader) ReadInt32() int32 {
byte1 := int32(self.ReadUint8())
byte2 := int32(self.ReadUint8())
byte3 := int32(self.ReadUint8())
byte4 := int32(self.ReadUint8())
return (byte1 << 24) | (byte2 << 16) | (byte3 << 8) | byte4
}
// used by lookupswitch and tableswitch
func (self *BytecodeReader) ReadInt32s(n int32) []int32 {
ints := make([]int32, n)
for i := range ints {
ints[i] = self.ReadInt32()
}
return ints
}
// used by lookupswitch and tableswitch
func (self *BytecodeReader) SkipPadding() {
for self.pc%4 != 0 {
self.ReadUint8()
}
}
代码解释
结构体
在其中定义BytecodeReader结构体code字段存放字节码,pc字段记录读取到了哪个字节。
Reset方法
为了避免每次解码指令都新创建一个BytecodeReader实例,给它定义一个Reset()方法,后面才用到

Read方法
下面实现一系列的Read()方法。先看最简单的ReadUint8()方法
ReadInt8()方法调用ReadUint8(),然后把读取到的值转成int8返回,代码如下:

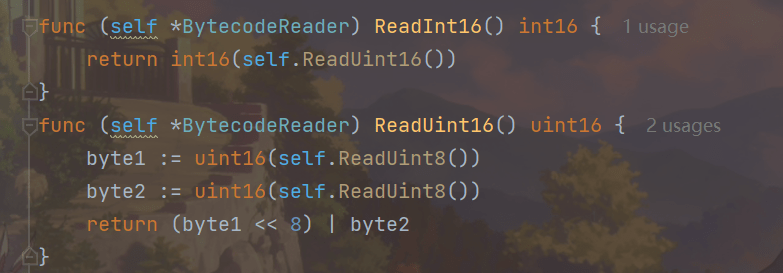
ReadUint16()连续读取两字节,ReadInt16()方法调用ReadUint16(),然后把读取到的值转成int16返回,
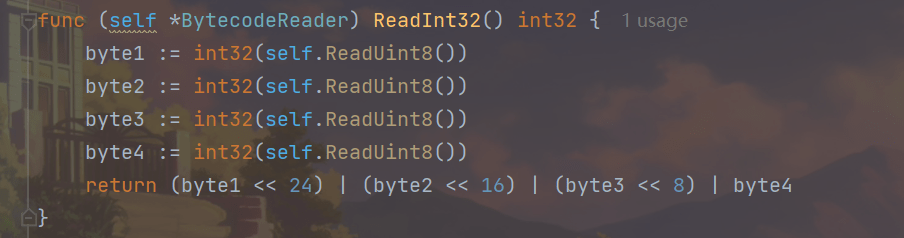
ReadInt32()方法连续读取4字节
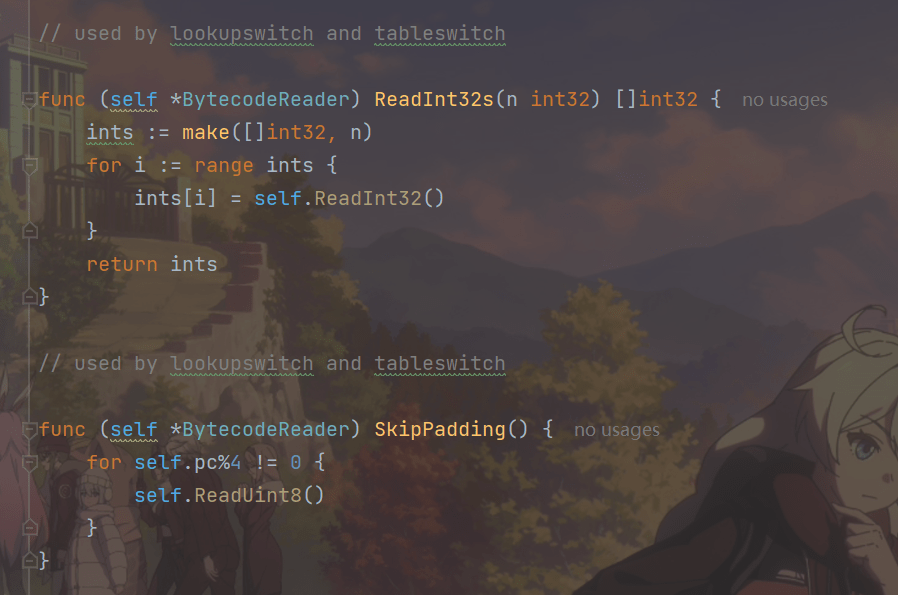
还需要定义两个方法:ReadInt32s()和SkipPadding()。这两个方法只有tableswitch和lookupswitch指令使用。以后还会再说。
3.常量指令
常量指令把常量推入操作数栈顶。常量可以来自三个地方:隐含在操作码里、操作数和运行时常量池。常量指令共有21条,本节实现其中的18条。另外3条是ldc系列指令,用于从运行时常量池中
加载常量,将在第6章介绍。
nop指令
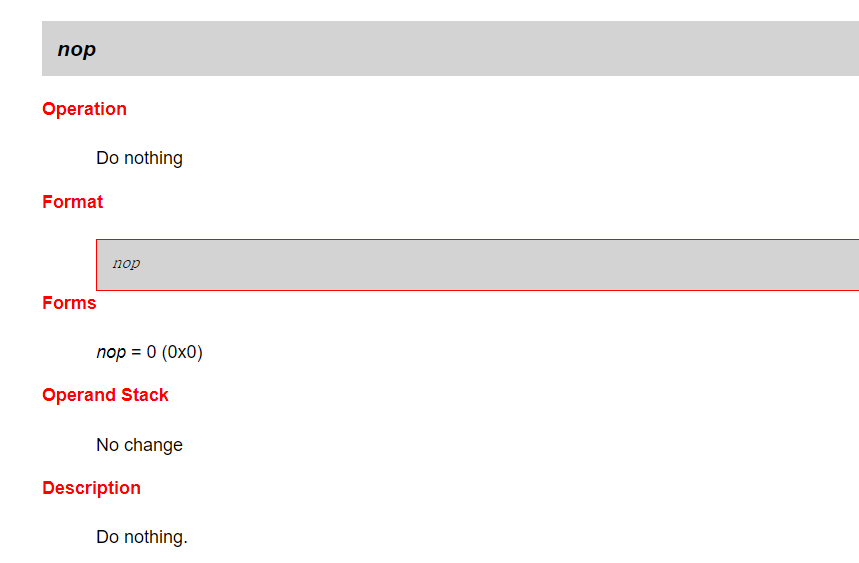
nop指令是最简单的一条指令,因为它什么也不做。
在instructions\constants目录下创建nop.go文件,在其中实现nop指令,代码如下:
package constants

import (
    "jvmgo/ch05/instructions/base"
    "jvmgo/ch05/rtda"
)


// Do nothing

type NOP struct{ base.NoOperandsInstruction }

func (self *NOP) Execute(frame *rtda.Frame) {
    // really do nothing
}
const系列指令
指令const系列
用于对特定的常量入栈,入栈的常量隐含在指令本身里,指令有: iconst_<i> (i从-1到5)、lconst_<l> (l从0到1)、fconst_<f> (f从0到2)、dconst_<d> (d从0到1)、 aconst_null.
注意:
- iconst_m1将-1压入操作数栈;
- iconst_x (x为0到5) 将x压入栈;
- lconst_0、lconst_1分别将长整数0和1压入栈;
- fconst_0、fconst_1、fconst_2分别将浮点数0、1、2压入栈;
- dconst_0和dconst_1分别将double型0和1压入栈。
- aconst_null将null压入操作数栈;
从指令的命名上不难找出规律,指令助记符的第一个字符总是喜欢表示数据类型,i表示整数,l表示长整数,f表示浮点数,d表示双精度浮点,习惯上用a表示对象引用。如果指令隐含操作的参数,会以下划线形式给出。
整体代码
这一系列指令把隐含在操作码中的常量值推入操作数栈顶。
在instructions\constants目录下创建const.go文件,在其中定义15条指令,代码如下:
package constants
import (
"jvmgo/ch05/instructions/base"
"jvmgo/ch05/rtda"
)
// Push null
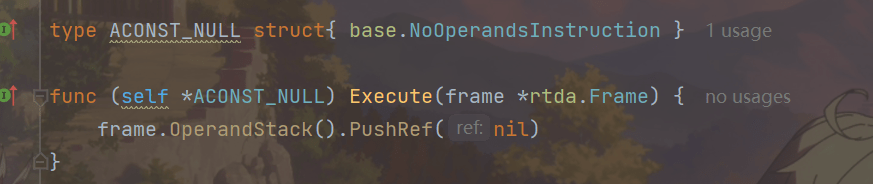
type ACONST_NULL struct{ base.NoOperandsInstruction }
func (self *ACONST_NULL) Execute(frame *rtda.Frame) {
frame.OperandStack().PushRef(nil)
}
// Push double
type DCONST_0 struct{ base.NoOperandsInstruction }
func (self *DCONST_0) Execute(frame *rtda.Frame) {
frame.OperandStack().PushDouble(0.0)
}
type DCONST_1 struct{ base.NoOperandsInstruction }
func (self *DCONST_1) Execute(frame *rtda.Frame) {
frame.OperandStack().PushDouble(1.0)
}
// Push float
type FCONST_0 struct{ base.NoOperandsInstruction }
func (self *FCONST_0) Execute(frame *rtda.Frame) {
frame.OperandStack().PushFloat(0.0)
}
type FCONST_1 struct{ base.NoOperandsInstruction }
func (self *FCONST_1) Execute(frame *rtda.Frame) {
frame.OperandStack().PushFloat(1.0)
}
type FCONST_2 struct{ base.NoOperandsInstruction }
func (self *FCONST_2) Execute(frame *rtda.Frame) {
frame.OperandStack().PushFloat(2.0)
}
// Push int constant
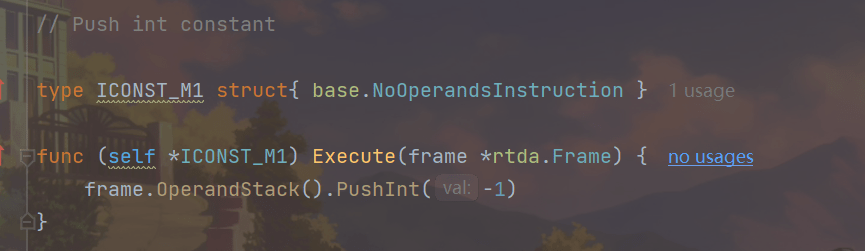
type ICONST_M1 struct{ base.NoOperandsInstruction }
func (self *ICONST_M1) Execute(frame *rtda.Frame) {
frame.OperandStack().PushInt(-1)
}
type ICONST_0 struct{ base.NoOperandsInstruction }
func (self *ICONST_0) Execute(frame *rtda.Frame) {
frame.OperandStack().PushInt(0)
}
type ICONST_1 struct{ base.NoOperandsInstruction }
func (self *ICONST_1) Execute(frame *rtda.Frame) {
frame.OperandStack().PushInt(1)
}
type ICONST_2 struct{ base.NoOperandsInstruction }
func (self *ICONST_2) Execute(frame *rtda.Frame) {
frame.OperandStack().PushInt(2)
}
type ICONST_3 struct{ base.NoOperandsInstruction }
func (self *ICONST_3) Execute(frame *rtda.Frame) {
frame.OperandStack().PushInt(3)
}
type ICONST_4 struct{ base.NoOperandsInstruction }
func (self *ICONST_4) Execute(frame *rtda.Frame) {
frame.OperandStack().PushInt(4)
}
type ICONST_5 struct{ base.NoOperandsInstruction }
func (self *ICONST_5) Execute(frame *rtda.Frame) {
frame.OperandStack().PushInt(5)
}
// Push long constant
type LCONST_0 struct{ base.NoOperandsInstruction }
func (self *LCONST_0) Execute(frame *rtda.Frame) {
frame.OperandStack().PushLong(0)
}
type LCONST_1 struct{ base.NoOperandsInstruction }
func (self *LCONST_1) Execute(frame *rtda.Frame) {
frame.OperandStack().PushLong(1)
}
代码解释
全部代码已给出,代码结构基本相同。
以3条指令为例进行说明。aconst_null指令把null引用推入操作数栈顶,代码如下:
dconst_0指令把double型0推入操作数栈顶,代码如下:

iconst_m1指令把int型-1推入操作数栈顶,代码如下:
bipush和sipush指令
指令push系列:
当数超过指令const范围,就使用push(整数,其余直接使用ldc)
- 主要包括bipush和sipush,它们的区别在于接收数据类型的不同,bipush接收8位整数作为参数,sipush接收16位整数,它们都将参数压入栈。
bipush指令从操作数中获取一个byte型整数,扩展成int型,然后推入栈顶。sipush指令从操作数中获取一个short型整数,扩展成int型,然后推入栈顶。
整体代码
在instructions\constants目录下创建ipush.go文件,在其中定义bipush和sipush指令,代码如下:
package constants
import (
"jvmgo/ch05/instructions/base"
"jvmgo/ch05/rtda"
)
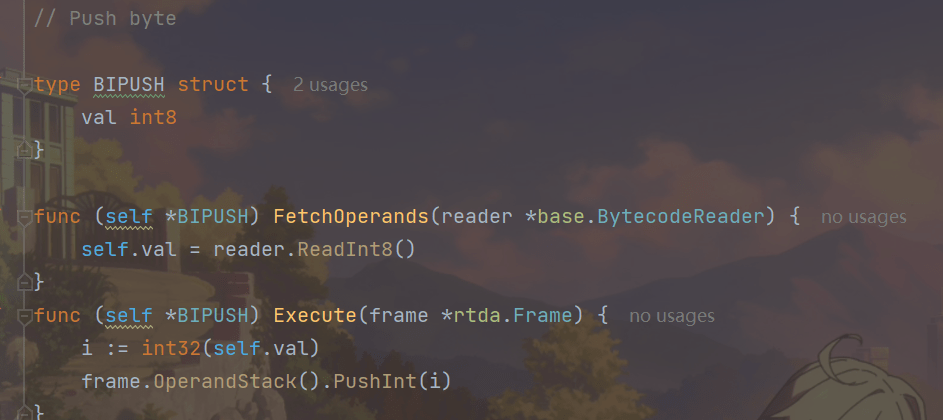
// Push byte
type BIPUSH struct {
val int8
}
func (self *BIPUSH) FetchOperands(reader *base.BytecodeReader) {
self.val = reader.ReadInt8()
}
func (self *BIPUSH) Execute(frame *rtda.Frame) {
i := int32(self.val)
frame.OperandStack().PushInt(i)
}
// Push short
type SIPUSH struct {
val int16
}
func (self *SIPUSH) FetchOperands(reader *base.BytecodeReader) {
self.val = reader.ReadInt16()
}
func (self *SIPUSH) Execute(frame *rtda.Frame) {
i := int32(self.val)
frame.OperandStack().PushInt(i)
}代码解释
以bipush指令为例,FetchOperands()和Execute()方法的代码如下,过于简单,不在阐述。
4.加载指令
局部变量压栈指令将给定的局部变量表中的数据压入操作数栈。
这类指令大体可以分为:
- xload_<n> (x为i、1、f、d、a, n为 0 到 3)
- xload (x为i、l、f、d、 a)
说明:在这里,x的取值表示数据类型。
- 指令xload_n表示将第n个局部变量压入操作数栈,比如iload_1、fload_0、 aload_0等指令。其中aload_n表示将一个对象引用压栈。
- 指令xload通过指定参数的形式,把局部变量压入操作数栈,当使用这个命令时,表示局部变量的数量可能超过了3个,比如指令iload、fload等。
加载指令从局部变量表获取变量,然后推入操作数栈顶。加载指令共33条,
按照所操作变量的类型可以分为6类:
- aload系列指令操作引用类型变量、
- dload系列操作double类型变量、
- fload系列操作float变量、
- iload系列操作int变量、
- lload系列操作long变量、
- xaload操作数组。
本节实现其中的25条,数组和xaload系列指令将在第8章讨论。。
整体代码
在instructions\loads目录下创建iload.go文件,在其中定义5条指令,代码如下:
package loads
import (
"jvmgo/ch05/instructions/base"
"jvmgo/ch05/rtda"
)
// Load int from local variable
type ILOAD struct{ base.Index8Instruction }
func (self *ILOAD) Execute(frame *rtda.Frame) {
_iload(frame, self.Index)
}
type ILOAD_0 struct{ base.NoOperandsInstruction }
func (self *ILOAD_0) Execute(frame *rtda.Frame) {
_iload(frame, 0)
}
type ILOAD_1 struct{ base.NoOperandsInstruction }
func (self *ILOAD_1) Execute(frame *rtda.Frame) {
_iload(frame, 1)
}
type ILOAD_2 struct{ base.NoOperandsInstruction }
func (self *ILOAD_2) Execute(frame *rtda.Frame) {
_iload(frame, 2)
}
type ILOAD_3 struct{ base.NoOperandsInstruction }
func (self *ILOAD_3) Execute(frame *rtda.Frame) {
_iload(frame, 3)
}
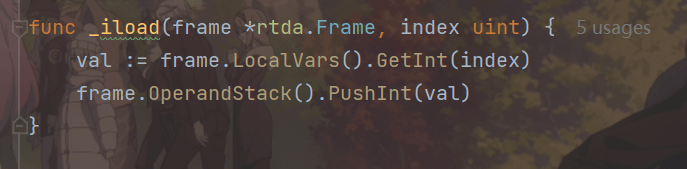
func _iload(frame *rtda.Frame, index uint) {
val := frame.LocalVars().GetInt(index)
frame.OperandStack().PushInt(val)
}在instructions\loads目录下创建aload.go文件
package loads

import (
    "jvmgo/ch05/instructions/base"
    "jvmgo/ch05/rtda"
)

// Load reference from local variable

type ALOAD struct{ base.Index8Instruction }

func (self *ALOAD) Execute(frame *rtda.Frame) {
    _aload(frame, self.Index)
}

type ALOAD_0 struct{ base.NoOperandsInstruction }

func (self *ALOAD_0) Execute(frame *rtda.Frame) {
    _aload(frame, 0)
}

type ALOAD_1 struct{ base.NoOperandsInstruction }

func (self *ALOAD_1) Execute(frame *rtda.Frame) {
    _aload(frame, 1)
}

type ALOAD_2 struct{ base.NoOperandsInstruction }

func (self *ALOAD_2) Execute(frame *rtda.Frame) {
    _aload(frame, 2)
}

type ALOAD_3 struct{ base.NoOperandsInstruction }

func (self *ALOAD_3) Execute(frame *rtda.Frame) {
    _aload(frame, 3)
}

func _aload(frame *rtda.Frame, index uint) {
    ref := frame.LocalVars().GetRef(index)
    frame.OperandStack().PushRef(ref)
}
在ch05\instructions\loads目录下创建dload.go文件
package loads

import (
    "jvmgo/ch05/instructions/base"
    "jvmgo/ch05/rtda"
)

// Load double from local variable

type DLOAD struct{ base.Index8Instruction }

func (self *DLOAD) Execute(frame *rtda.Frame) {
    _dload(frame, self.Index)
}

type DLOAD_0 struct{ base.NoOperandsInstruction }

func (self *DLOAD_0) Execute(frame *rtda.Frame) {
    _dload(frame, 0)
}

type DLOAD_1 struct{ base.NoOperandsInstruction }

func (self *DLOAD_1) Execute(frame *rtda.Frame) {
    _dload(frame, 1)
}

type DLOAD_2 struct{ base.NoOperandsInstruction }

func (self *DLOAD_2) Execute(frame *rtda.Frame) {
    _dload(frame, 2)
}

type DLOAD_3 struct{ base.NoOperandsInstruction }

func (self *DLOAD_3) Execute(frame *rtda.Frame) {
    _dload(frame, 3)
}

func _dload(frame *rtda.Frame, index uint) {
    val := frame.LocalVars().GetDouble(index)
    frame.OperandStack().PushDouble(val)
}
在instructions\loads目录下创建fload.go文件
package loads

import (
    "jvmgo/ch05/instructions/base"
    "jvmgo/ch05/rtda"
)

// Load float from local variable

type FLOAD struct{ base.Index8Instruction }

func (self *FLOAD) Execute(frame *rtda.Frame) {
    _fload(frame, self.Index)
}

type FLOAD_0 struct{ base.NoOperandsInstruction }

func (self *FLOAD_0) Execute(frame *rtda.Frame) {
    _fload(frame, 0)
}

type FLOAD_1 struct{ base.NoOperandsInstruction }

func (self *FLOAD_1) Execute(frame *rtda.Frame) {
    _fload(frame, 1)
}

type FLOAD_2 struct{ base.NoOperandsInstruction }

func (self *FLOAD_2) Execute(frame *rtda.Frame) {
    _fload(frame, 2)
}

type FLOAD_3 struct{ base.NoOperandsInstruction }

func (self *FLOAD_3) Execute(frame *rtda.Frame) {
    _fload(frame, 3)
}

func _fload(frame *rtda.Frame, index uint) {
    val := frame.LocalVars().GetFloat(index)
    frame.OperandStack().PushFloat(val)
}
在instructions\loads目录下创建lload.go文件
package loads

import (
    "jvmgo/ch05/instructions/base"
    "jvmgo/ch05/rtda"
)


// Load long from local variable

type LLOAD struct{ base.Index8Instruction }

func (self *LLOAD) Execute(frame *rtda.Frame) {
    _lload(frame, self.Index)
}

type LLOAD_0 struct{ base.NoOperandsInstruction }

func (self *LLOAD_0) Execute(frame *rtda.Frame) {
    _lload(frame, 0)
}

type LLOAD_1 struct{ base.NoOperandsInstruction }

func (self *LLOAD_1) Execute(frame *rtda.Frame) {
    _lload(frame, 1)
}

type LLOAD_2 struct{ base.NoOperandsInstruction }

func (self *LLOAD_2) Execute(frame *rtda.Frame) {
    _lload(frame, 2)
}

type LLOAD_3 struct{ base.NoOperandsInstruction }

func (self *LLOAD_3) Execute(frame *rtda.Frame) {
    _lload(frame, 3)
}

func _lload(frame *rtda.Frame, index uint) {
    val := frame.LocalVars().GetLong(index)
    frame.OperandStack().PushLong(val)
}
代码解释
下面以iload系列为例介绍加载指令
为了避免重复代码,定义一个函数供iload系列指令使用:
iload指令的索引来自操作数,其Execute()方法如下:

其余4条指令的索引隐含在操作码中,以iload_1为例,其Execute()方法如下:
5.参考
尚硅谷宋红康:JVM全套教程:https://www.bilibili.com/video/BV1PJ411n7xZ
周志明:深入理解java虚拟机
张秀宏:自己动手写Java虚拟机 (Java核心技术系列)