1.简单原理
当初始化Spring Security时,会创建一个名为SpringSecurityFilterChain的Servlet过滤器,类型为 org.springframework.security.web.FilterChainProxy,它实现了javax.servlet.Filter,因此外部的请求会经过此类,下图是Spring Security过虑器链结构图:
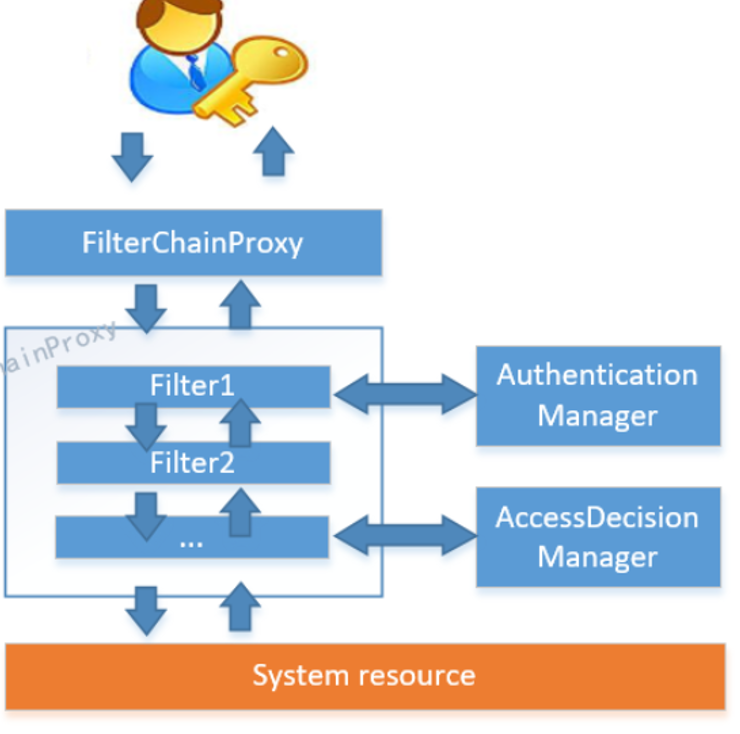
FilterChainProxy是一个代理,真正起作用的是FilterChainProxy中SecurityFilterChain所包含的各个Filter,同时这些Filter作为Bean被Spring管理,它们是Spring Security核心,各有各的职责,但他们并不直接处理用户的认证,也不直接处理用户的授权,而是把它们交给了认证管理器(AuthenticationManager)和决策管理器(AccessDecisionManager)进行处理。
spring Security功能的实现主要是由一系列过滤器链相互配合完成。
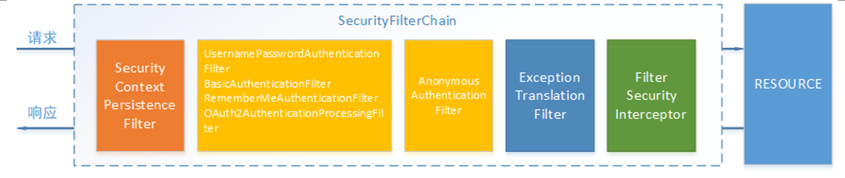
下面介绍过滤器链中主要的几个过滤器及其作用:
SecurityContextPersistenceFilter 这个Filter是整个拦截过程的入口和出口(也就是第一个和最后一个拦截器),会在请求开始时从配置好的 SecurityContextRepository 中获取 SecurityContext,然后把它设置给 SecurityContextHolder。在请求完成后将 SecurityContextHolder 持有的 SecurityContext 再保存到配置好的 SecurityContextRepository,同时清除 securityContextHolder 所持有的 SecurityContext;
UsernamePasswordAuthenticationFilter 用于处理来自表单提交的认证。该表单必须提供对应的用户名和密码,其内部还有登录成功或失败后进行处理的 AuthenticationSuccessHandler 和 AuthenticationFailureHandler,这些都可以根据需求做相关改变;
FilterSecurityInterceptor 是用于保护web资源的,使用AccessDecisionManager对当前用户进行授权访问,前面已经详细介绍过了;
ExceptionTranslationFilter 能够捕获来自 FilterChain 所有的异常,并进行处理。但是它只会处理两类异常:AuthenticationException 和 AccessDeniedException,其它的异常它会继续抛出。
Spring Security的执行流程如下:
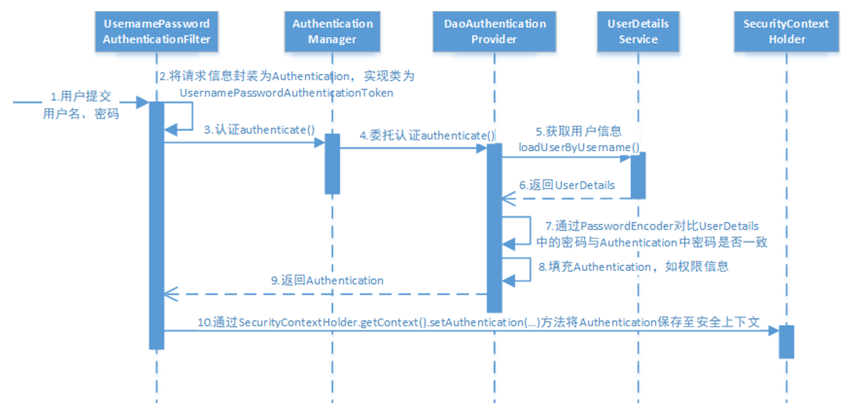
1. 用户提交用户名、密码被SecurityFilterChain中的UsernamePasswordAuthenticationFilter过滤器获取到,封装为请求Authentication,通常情况下是UsernamePasswordAuthenticationToken这个实现类。
2. 然后过滤器将Authentication提交至认证管理器(AuthenticationManager)进行认证
3. 认证成功后,AuthenticationManager身份管理器返回一个被填充满了信息的(包括上面提到的权限信息,身份信息,细节信息,但密码通常会被移除)Authentication实例。
4. SecurityContextHolder安全上下文容器将第3步填充了信息的Authentication,通过SecurityContextHolder.getContext().setAuthentication(…)方法,设置到其中。
5. 可以看出AuthenticationManager接口(认证管理器)是认证相关的核心接口,也是发起认证的出发点,它的实现类为ProviderManager。而Spring Security支持多种认证方式,因此ProviderManager维护着一个List<AuthenticationProvider>列表,存放多种认证方式,最终实际的认证工作是由AuthenticationProvider完成的。web表单的对应的AuthenticationProvider实现类为DaoAuthenticationProvider,它的内部又维护着一个UserDetailsService负责UserDetails的获取。最终AuthenticationProvider将UserDetails填充至Authentication。
接下来看Oauth2.0协议
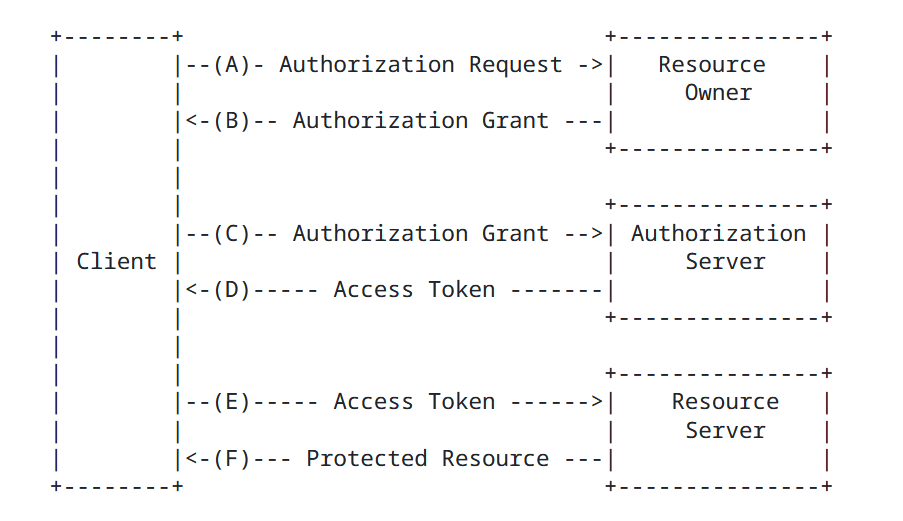
Oauth2包括以下角色:
1.客户端:本身不存储资源,需要通过资源拥有者的授权去请求资源服务器的资源,比如:手机客户端、浏览器等。
2.资源拥有者:通常为用户,也可以是应用程序,即该资源的拥有者。
A表示 客户端请求资源拥有者授权。
B表示 资源拥有者授权客户端即网站访问自己的用户信息。
3.授权服务器(也称认证服务器)
认证服务器对资源拥有者进行认证,还会对客户端进行认证并颁发令牌。
C 客户端即网站携带授权码请求认证。
D认证通过颁发令牌。
4.资源服务器:存储资源的服务器。
E表示客户端即网站携带令牌请求资源服务器获取资源。
F表示资源服务器校验令牌通过后提供受保护资源。
2.简单使用
新建认证服务auth-service模块
接着就是先加入依赖
<dependency>
    <groupId>org.springframework.cloud</groupId>
    <artifactId>spring-cloud-starter-security</artifactId>
</dependency>
<dependency>
    <groupId>org.springframework.cloud</groupId>
    <artifactId>spring-cloud-starter-oauth2</artifactId>
</dependency>
随便几个请求
package com.dreams.creation.controller;


import com.dreams.creation.model.entity.DcUser;
import com.dreams.creation.service.UserFeignClient;
import lombok.extern.slf4j.Slf4j;
import org.springframework.web.bind.annotation.PathVariable;
import org.springframework.web.bind.annotation.RequestMapping;
import org.springframework.web.bind.annotation.RestController;

import javax.annotation.Resource;

@Slf4j
@RestController
public class LoginController {

    @Resource
    private UserFeignClient userFeignClient;

    @RequestMapping("/login")
    public String loginSuccess() {
        return "登录成功";
    }


    @RequestMapping("/user/{id}")
    public DcUser getuser(@PathVariable("id") Long id) {
        DcUser user = userFeignClient.getById(id);
        return user;
    }

    @RequestMapping("/d/d1")
    public String r1() {
        return "访问资源1";
    }

    @RequestMapping("/d/d2")
    public String r2() {
        return "访问资源2";
    }

}
接着加入配置类
也就是使用这些账户登录
package com.dreams.creation.config;

import org.springframework.context.annotation.Bean;
import org.springframework.security.config.annotation.method.configuration.EnableGlobalMethodSecurity;
import org.springframework.security.config.annotation.web.builders.HttpSecurity;
import org.springframework.security.config.annotation.web.configuration.EnableWebSecurity;
import org.springframework.security.config.annotation.web.configuration.WebSecurityConfigurerAdapter;
import org.springframework.security.core.userdetails.User;
import org.springframework.security.core.userdetails.UserDetailsService;
import org.springframework.security.crypto.password.NoOpPasswordEncoder;
import org.springframework.security.crypto.password.PasswordEncoder;
import org.springframework.security.provisioning.InMemoryUserDetailsManager;

/**
 * @description 安全管理配置
 */
@EnableWebSecurity
@EnableGlobalMethodSecurity(securedEnabled = true,prePostEnabled = true)
public class WebSecurityConfig extends WebSecurityConfigurerAdapter {


    //配置用户信息服务
    @Bean
    public UserDetailsService userDetailsService() {
        //这里配置用户信息,这里暂时使用这种方式将用户存储在内存中
        InMemoryUserDetailsManager manager = new InMemoryUserDetailsManager();
        manager.createUser(User.withUsername("dreams").password("123").authorities("d1").build());
        manager.createUser(User.withUsername("admin").password("123").authorities("d2").build());
        return manager;
    }

    @Bean
    public PasswordEncoder passwordEncoder() {
//        //密码为明文方式
        return NoOpPasswordEncoder.getInstance();
    }

    //配置安全拦截机制
    @Override
    protected void configure(HttpSecurity http) throws Exception {
        http
                .authorizeRequests()
                .antMatchers("/d/**").authenticated()//访问/d开始的请求需要认证通过
                .anyRequest().permitAll()//其它请求全部放行
                .and()
                .formLogin().successForwardUrl("/login");//登录成功跳转到/login-success
    }

}
这样他就受spring security管控了,前端页面就是自动生成的
根据上面配置类也可以看到只有拥有权限才可以访问
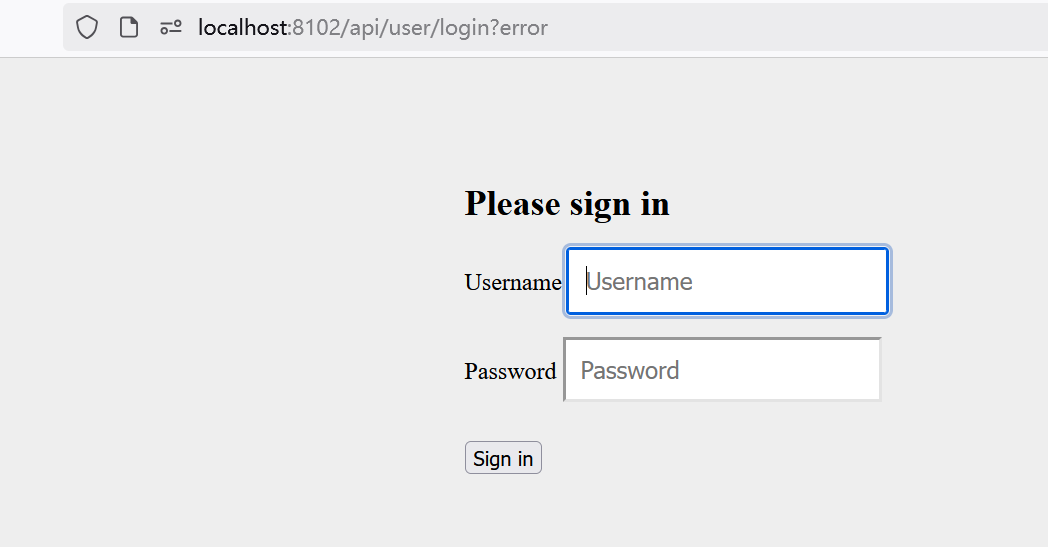
访问d开头的路径就会跳转到登录页面
/api/user是我yml文件配置的前缀
吐槽一下,这个css是正常的,只不过会慢一点才显示出来
竟然要翻墙才能快一点显示CSS
如果想要权限,就加上PreAuthorize注解
@RequestMapping("/d/d1")
@PreAuthorize("hasAuthority('d1')")//拥有d1权限方可访问
public String r1() {
    return "访问资源1";
}
这样只有拥有d1权限方可访问
3.OAuth2的授权模式
Spring Security支持OAuth2认证,OAuth2提供授权码模式、密码模式、简化模式、客户端模式等四种授权模式,微信扫码登录的例子就是基于授权码模式,这四种模式中授权码模式和密码模式应用较多。
首先我们加入两个配置类
AuthorizationServer用 @EnableAuthorizationServer 注解标识并继承AuthorizationServerConfigurerAdapter来配置OAuth2.0 授权服务器。
package com.dreams.creation.config;

import org.springframework.beans.factory.annotation.Autowired;
import org.springframework.context.annotation.Bean;
import org.springframework.context.annotation.Configuration;
import org.springframework.http.HttpMethod;
import org.springframework.security.authentication.AuthenticationManager;
import org.springframework.security.crypto.bcrypt.BCryptPasswordEncoder;
import org.springframework.security.oauth2.config.annotation.configurers.ClientDetailsServiceConfigurer;
import org.springframework.security.oauth2.config.annotation.web.configuration.AuthorizationServerConfigurerAdapter;
import org.springframework.security.oauth2.config.annotation.web.configuration.EnableAuthorizationServer;
import org.springframework.security.oauth2.config.annotation.web.configurers.AuthorizationServerEndpointsConfigurer;
import org.springframework.security.oauth2.config.annotation.web.configurers.AuthorizationServerSecurityConfigurer;
import org.springframework.security.oauth2.provider.token.AuthorizationServerTokenServices;
import org.springframework.security.oauth2.provider.token.DefaultTokenServices;

import javax.annotation.Resource;

/**
 * @description 授权服务器配置
 */
 @Configuration
 @EnableAuthorizationServer
 public class AuthorizationServer extends AuthorizationServerConfigurerAdapter {

  @Resource(name="authorizationServerTokenServicesCustom")
  private AuthorizationServerTokenServices authorizationServerTokenServices;

 @Autowired
 private AuthenticationManager authenticationManager;

  //客户端详情服务
  @Override
  public void configure(ClientDetailsServiceConfigurer clients)
          throws Exception {
        clients.inMemory()// 使用in-memory存储
                .withClient("DreamsWebApp")// client_id
                .secret("DreamsWebApp")//客户端密钥
//                .secret(new BCryptPasswordEncoder().encode("DreamsWebApp"))//客户端密钥
                .resourceIds("dreams-creation")//资源列表
                .authorizedGrantTypes("authorization_code", "password","client_credentials","implicit","refresh_token")// 该client允许的授权类型authorization_code,password,refresh_token,implicit,client_credentials
                .scopes("all")// 允许的授权范围
                .autoApprove(false)//false跳转到授权页面
                //客户端接收授权码的重定向地址
                .redirectUris("http://www.tandream.site")
   ;
  }


  //令牌端点的访问配置
  @Override
  public void configure(AuthorizationServerEndpointsConfigurer endpoints) {
   endpoints
           .authenticationManager(authenticationManager)//认证管理器
           .tokenServices(authorizationServerTokenServices)//令牌管理服务
           .allowedTokenEndpointRequestMethods(HttpMethod.POST);
  }

  //令牌端点的安全配置
  @Override
  public void configure(AuthorizationServerSecurityConfigurer security){
   security
           .tokenKeyAccess("permitAll()")                    //oauth/token_key是公开
           .checkTokenAccess("permitAll()")                  //oauth/check_token公开
           .allowFormAuthenticationForClients()          //表单认证(申请令牌)
   ;
  }


 }
1)ClientDetailsServiceConfigurer:用来配置客户端详情服务(ClientDetailsService),服务提供商会给批准接入的客户端一个身份,用于接入时的凭据,有客户端标识和客户端秘钥,在这里配置批准接入的客户端的详细信息。
2)AuthorizationServerEndpointsConfigurer:用来配置令牌(token)的访问端点和令牌服务(token services)。
3)AuthorizationServerSecurityConfigurer:用来配置令牌端点的安全约束.
还有TokenConfig令牌策略配置类
暂时先使用InMemoryTokenStore在内存存储令牌,令牌的有效期等信息配置如下:
package com.dreams.creation.config;

import org.springframework.beans.factory.annotation.Autowired;
import org.springframework.context.annotation.Bean;
import org.springframework.context.annotation.Configuration;
import org.springframework.security.oauth2.provider.token.AuthorizationServerTokenServices;
import org.springframework.security.oauth2.provider.token.DefaultTokenServices;
import org.springframework.security.oauth2.provider.token.TokenStore;
import org.springframework.security.oauth2.provider.token.store.InMemoryTokenStore;

/**
 * @author Administrator
 **/
@Configuration
public class TokenConfig {

    @Autowired
    TokenStore tokenStore;

    @Bean
    public TokenStore tokenStore() {
        //使用内存存储令牌(普通令牌)
        return new InMemoryTokenStore();
    }

    //令牌管理服务
    @Bean(name="authorizationServerTokenServicesCustom")
    public AuthorizationServerTokenServices tokenService() {
        DefaultTokenServices service=new DefaultTokenServices();
        service.setSupportRefreshToken(true);//支持刷新令牌
        service.setTokenStore(tokenStore);//令牌存储策略
        service.setAccessTokenValiditySeconds(7200); // 令牌默认有效期2小时
        service.setRefreshTokenValiditySeconds(259200); // 刷新令牌默认有效期3天
        return service;
    }


}
然后在WebSecurityConfig注入Bean
@Bean
public AuthenticationManager authenticationManagerBean() throws Exception {
    return super.authenticationManagerBean();
}
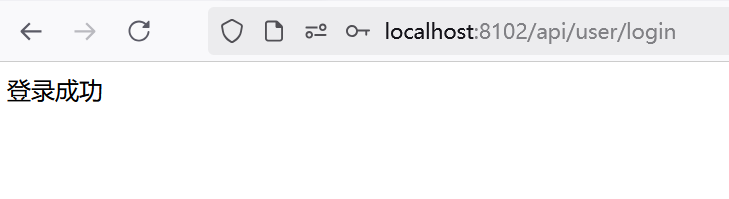
访问,注意要先登录才能认证,所以先要使用上面的登录功能
http://localhost:8102/api/user/login
然后访问
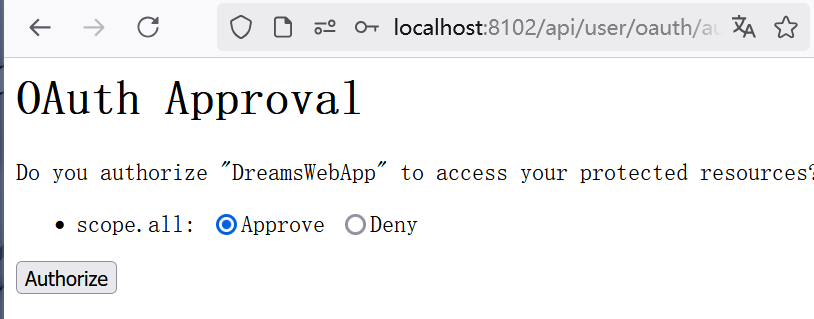
选择Approve再点击Authorize就会跳转到www.tandream.site
还会有一个授权码的
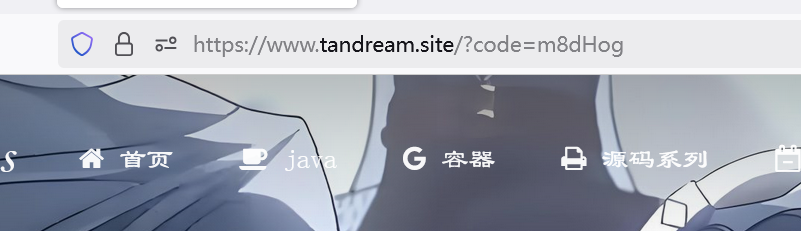
根据上面的流程,拿到授权码就可以去申请令牌了
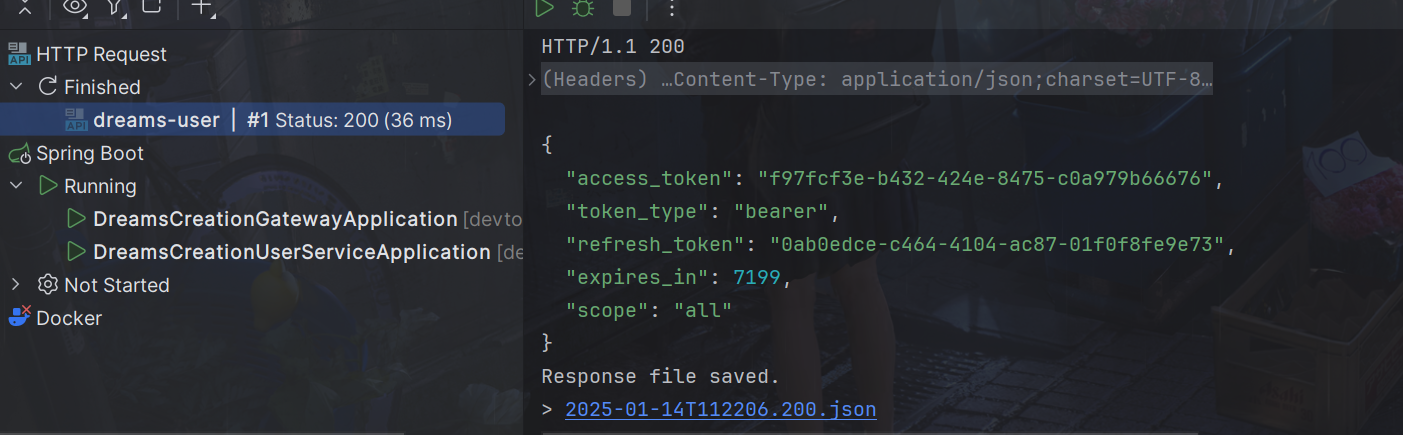
写个http文件请求
下面的参数严格按照AuthorizationServer文件配置
POST http://localhost:8102/api/user/oauth/token?client_id=DreamsWebApp&client_secret=DreamsWebApp&grant_type=authorization_code&code=m8dHog&redirect_uri=http://www.tandream.site
access_token就是令牌
4.OAuth2的密码模式
步骤简单一点:
- 资源拥有者提供账号和密码
- 客户端向认证服务申请令牌,请求中携带账号和密码
- 认证服务校验账号和密码正确颁发令牌。
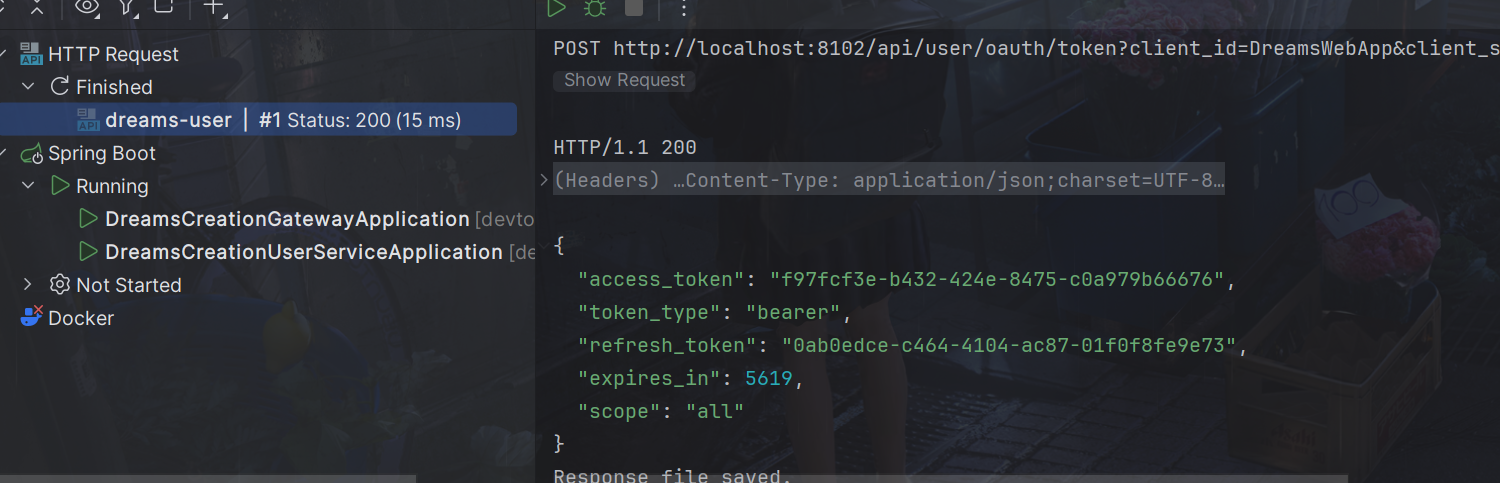
POST请求获取令牌
POST http://localhost:8102/api/user/oauth/token?client_id=DreamsWebApp&client_secret=DreamsWebApp&grant_type=password&username=dreams&password=123
参数列表如下:
- client_id:客户端准入标识。
- client_secret:客户端秘钥。
- grant_type:授权类型,填写password表示密码模式
- username:资源拥有者用户名。
- password:资源拥有者密码。
同样可以拿到
5.校检令牌合理
上面的步骤如下:
- 客户端携带令牌访问资源服务获取资源。
- 资源服务远程请求认证服务校验令牌的合法性
- 如果令牌合法资源服务向客户端返回资源。
这里存在一个问题:
就是校验令牌需要远程请求认证服务,客户端的每次访问都会远程校验,执行性能低。
如果能够让资源服务自己校验令牌的合法性将省去远程请求认证服务的成本,提高了性能。
所以我们通过引入JWT解决
JSON Web Token(JWT)是一种使用JSON格式传递数据的网络令牌技术,它是一个开放的行业标准(RFC 7519),它定义了一种简洁的、自包含的协议格式,用于在通信双方传递json对象,传递的信息经过数字签名可以被验证和信任,它可以使用HMAC算法或使用RSA的公钥/私钥对来签名,防止内容篡改。
使用JWT可以实现无状态认证,什么是无状态认证?
传统的基于session的方式是有状态认证,用户登录成功将用户的身份信息存储在服务端,这样加大了服务端的存储压力,并且这种方式不适合在分布式系统中应用。
当用户访问应用服务,每个应用服务都会去服务器查看session信息,如果session中没有该用户则说明用户没有登录,此时就会重新认证,而解决这个问题的方法是Session复制、Session黏贴,或者统一存储在一个地方,比如redis session。
如果是基于令牌技术在分布式系统中实现认证则服务端不用存储session,可以将用户身份信息存储在令牌中,用户认证通过后认证服务颁发令牌给用户,用户将令牌存储在客户端,去访问应用服务时携带令牌去访问,服务端从jwt解析出用户信息。这个过程就是无状态认证。
JWT令牌的优点:
- jwt基于json,非常方便解析。
- 可以在令牌中自定义丰富的内容,易扩展。
- 通过非对称加密算法及数字签名技术,JWT防止篡改,安全性高。
- 资源服务使用JWT可不依赖认证服务即可完成授权。
缺点:JWT令牌较长,占存储空间比较大。
下边是一个JWT令牌的示例:
eyJhbGciOiJIUzI1NiIsInR5cCI6IkpXVCJ9.eyJhdWQiOlsicmVzMSJdLCJ1c2VyX25hbWUiOiJ6aGFuZ3NhbiIsInNjb3BlIjpbImFsbCJdLCJleHAiOjE2NjQyNTQ2NzIsImF1dGhvcml0aWVzIjpbInAxIl0sImp0aSI6Ijg4OTEyYjJkLTVkMDUtNGMxNC1iYmMzLWZkZTk5NzdmZWJjNiIsImNsaWVudF9pZCI6ImMxIn0.wkDBL7roLrvdBG2oGnXeoXq-zZRgE9IVV2nxd-ez_oA
JWT令牌由三部分组成,每部分中间使用点(.)分隔
1.Header
头部包括令牌的类型(即JWT)及使用的哈希算法(如HMAC SHA256或RSA)
一个例子如下:
下边是Header部分的内容
{
  "alg": "HS256",
  "typ": "JWT"
}
将上边的内容使用Base64Url编码,得到一个字符串就是JWT令牌的第一部分。
2.Payload
第二部分是负载,内容也是一个json对象,它是存放有效信息的地方,它可以存放jwt提供的信息字段,比如:iss(签发者),exp(过期时间戳), sub(面向的用户)等,也可自定义字段。
此部分不建议存放敏感信息,因为此部分可以解码还原原始内容。
最后将第二部分负载使用Base64Url编码,得到一个字符串就是JWT令牌的第二部分。
{
  "sub": "1234567890",
  "name": "456",
  "admin": true
}
3.Signature
第三部分是签名,此部分用于防止jwt内容被篡改。
这个部分使用base64url将前两部分进行编码,编码后使用点(.)连接组成字符串,最后使用header中声明的签名算法进行签名。
HMACSHA256(base64UrlEncode(header) + "." + base64UrlEncode(payload),secret)
base64UrlEncode(header):jwt令牌的第一部分。
base64UrlEncode(payload):jwt令牌的第二部分。
secret:签名所使用的密钥。
为什么JWT可以防止篡改?
第三部分使用签名算法对第一部分和第二部分的内容进行签名,常用的签名算法是 HS256,常见的还有md5,sha 等,签名算法需要使用密钥进行签名,密钥不对外公开,并且签名是不可逆的,如果第三方更改了内容那么服务器验证签名就会失败,要想保证验证签名正确必须保证内容、密钥与签名前一致。
从上图可以看出认证服务和资源服务使用相同的密钥,这叫对称加密,对称加密效率高,如果一旦密钥泄露可以伪造jwt令牌。
JWT还可以使用非对称加密,认证服务自己保留私钥,将公钥下发给受信任的客户端、资源服务,公钥和私钥是配对的,成对的公钥和私钥才可以正常加密和解密,非对称加密效率低但相比对称加密非对称加密更安全一些。
要使用JWT,修改TokenConfig,将原来的基于内存的改为注入JwtAccessTokenConverter
package com.dreams.creation.config;

import org.springframework.beans.factory.annotation.Autowired;
import org.springframework.context.annotation.Bean;
import org.springframework.context.annotation.Configuration;
import org.springframework.security.oauth2.provider.token.AuthorizationServerTokenServices;
import org.springframework.security.oauth2.provider.token.DefaultTokenServices;
import org.springframework.security.oauth2.provider.token.TokenEnhancerChain;
import org.springframework.security.oauth2.provider.token.TokenStore;
import org.springframework.security.oauth2.provider.token.store.JwtAccessTokenConverter;
import org.springframework.security.oauth2.provider.token.store.JwtTokenStore;

import java.util.Arrays;


@Configuration
public class TokenConfig {

    private String SIGNING_KEY = "dreams-jwt-key";

    @Autowired
    TokenStore tokenStore;

//    @Bean
//    public TokenStore tokenStore() {
//        //使用内存存储令牌(普通令牌)
//        return new InMemoryTokenStore();
//    }

    @Autowired
    private JwtAccessTokenConverter accessTokenConverter;

    @Bean
    public TokenStore tokenStore() {
        return new JwtTokenStore(accessTokenConverter());
    }

    @Bean
    public JwtAccessTokenConverter accessTokenConverter() {
        JwtAccessTokenConverter converter = new JwtAccessTokenConverter();
        converter.setSigningKey(SIGNING_KEY);
        return converter;
    }

    //令牌管理服务
    @Bean(name="authorizationServerTokenServicesCustom")
    public AuthorizationServerTokenServices tokenService() {
        DefaultTokenServices service=new DefaultTokenServices();
        service.setSupportRefreshToken(true);//支持刷新令牌
        service.setTokenStore(tokenStore);//令牌存储策略

        TokenEnhancerChain tokenEnhancerChain = new TokenEnhancerChain();
        tokenEnhancerChain.setTokenEnhancers(Arrays.asList(accessTokenConverter));
        service.setTokenEnhancer(tokenEnhancerChain);

        service.setAccessTokenValiditySeconds(7200); // 令牌默认有效期2小时
        service.setRefreshTokenValiditySeconds(259200); // 刷新令牌默认有效期3天
        return service;
    }
}
再使用上面的密码模式或授权模式就行了

参数解释:
- access_token,生成的jwt令牌,用于访问资源使用。
- token_type,bearer是在RFC6750中定义的一种token类型,在携带jwt访问资源时需要在head中加入bearer jwt令牌内容
- refresh_token,当jwt令牌快过期时使用刷新令牌可以再次生成jwt令牌。
- expires_in:过期时间(秒)
- scope,令牌的权限范围,服务端可以根据令牌的权限范围去对令牌授权。
- jti:令牌的唯一标识。
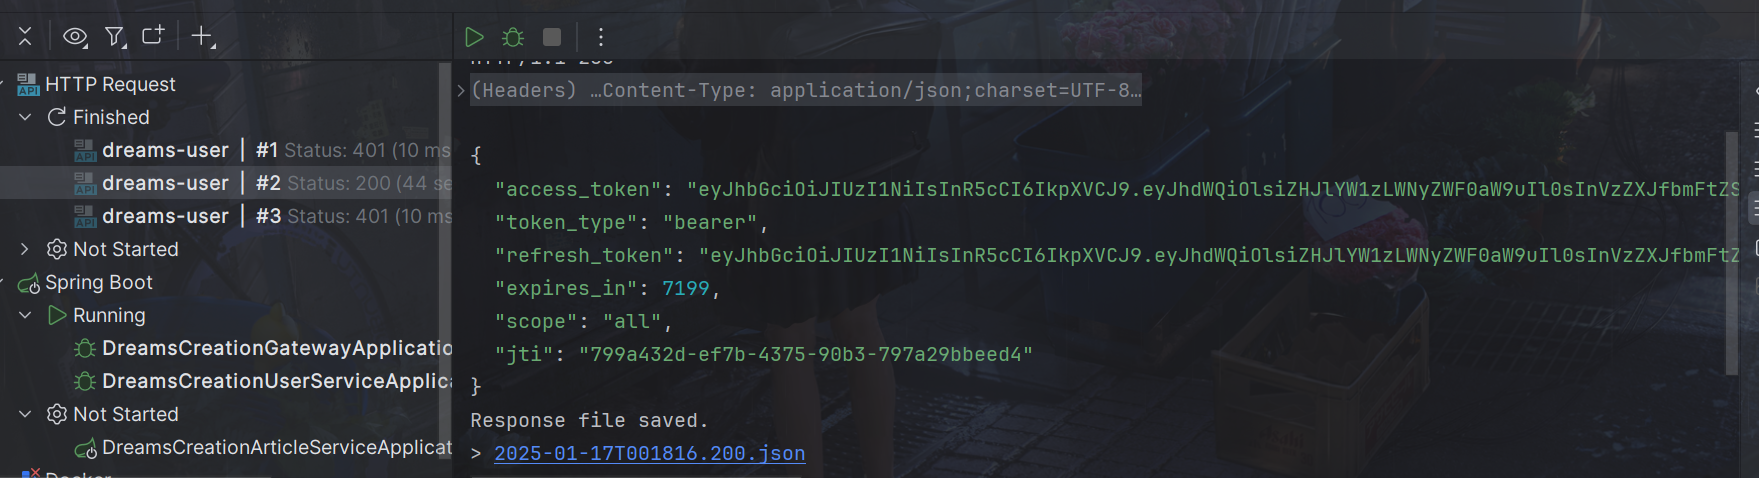
使用check_token就可以还原了,token=后面接上面返回的token
POST http://localhost:8102/api/user/oauth/check_token?token=eyJhbGciOiJIUzI1NiIsInR5cCI6IkpXVCJ9.eyJhdWQiOlsiZHJlYW1zLWNyZWF0aW9uIl0sInVzZXJfbmFtZSI6ImRyZWFtcyIsInNjb3BlIjpbImFsbCJdLCJleHAiOjE3MzY4Mzc0NjIsImF1dGhvcml0aWVzIjpbImQxIl0sImp0aSI6IjNlY2E2OGU5LTVlMWMtNGEyNi1hNGJjLWY4MDkzYTVmMjc1ZSIsImNsaWVudF9pZCI6IkRyZWFtc1dlYkFwcCJ9.3irJ131WJMeLNqBBoW-YO0xoJdNUdVgB9aFF73c7U50
6.资源服务校验令牌
需要认证的微服务,比如文章服务,加入依赖
<!--认证相关-->
<dependency>
    <groupId>org.springframework.cloud</groupId>
    <artifactId>spring-cloud-starter-security</artifactId>
</dependency>
<dependency>
    <groupId>org.springframework.cloud</groupId>
    <artifactId>spring-cloud-starter-oauth2</artifactId>
</dependency>
加入配置
添加资源服务配置
资源服务标识对应AuthorizationServer文件的.resourceIds(“dreams-creation”)//资源列表
package com.dreams.creation.config;

import org.springframework.beans.factory.annotation.Autowired;
import org.springframework.context.annotation.Configuration;
import org.springframework.security.config.annotation.method.configuration.EnableGlobalMethodSecurity;
import org.springframework.security.config.annotation.web.builders.HttpSecurity;
import org.springframework.security.oauth2.config.annotation.web.configuration.EnableResourceServer;
import org.springframework.security.oauth2.config.annotation.web.configuration.ResourceServerConfigurerAdapter;
import org.springframework.security.oauth2.config.annotation.web.configurers.ResourceServerSecurityConfigurer;
import org.springframework.security.oauth2.provider.token.TokenStore;

@Configuration
@EnableResourceServer
@EnableGlobalMethodSecurity(securedEnabled = true,prePostEnabled = true)
public class ResouceServerConfig extends ResourceServerConfigurerAdapter {


    //资源服务标识
    public static final String RESOURCE_ID = "dreams-creation";

    @Autowired
    TokenStore tokenStore;

    @Override
    public void configure(ResourceServerSecurityConfigurer resources) {
        resources.resourceId(RESOURCE_ID)//资源 id
                .tokenStore(tokenStore)
                .stateless(true);
    }

    @Override
    public void configure(HttpSecurity http) throws Exception {
        http.csrf().disable()
                .authorizeRequests()
                .antMatchers("/article/**").authenticated()//所有/article/**的请求必须认证通过
                .anyRequest().permitAll()
        ;
    }

}
添加TokenConfig
package com.dreams.creation.config;

import org.springframework.context.annotation.Bean;
import org.springframework.context.annotation.Configuration;
import org.springframework.security.oauth2.provider.token.TokenStore;
import org.springframework.security.oauth2.provider.token.store.JwtAccessTokenConverter;
import org.springframework.security.oauth2.provider.token.store.JwtTokenStore;

@Configuration
public class TokenConfig {

    //jwt签名密钥,与认证服务保持一致
    private String SIGNING_KEY = "dreams-jwt-key";

    @Bean
    public TokenStore tokenStore() {
        //JWT令牌存储方案
        return new JwtTokenStore(accessTokenConverter());
    }

    @Bean
    public JwtAccessTokenConverter accessTokenConverter() {
        JwtAccessTokenConverter converter = new JwtAccessTokenConverter();
        converter.setSigningKey(SIGNING_KEY);
        return converter;
    }

   /* @Bean
    public TokenStore tokenStore() {
        //使用内存存储令牌(普通令牌)
        return new InMemoryTokenStore();
    }*/
}
这时候就不能直接请求了
Authorization: Bearer后接token就行
GET http://0.0.0.0:8103/api/article/article/get/vo?id=1
Authorization: Bearer eyJhbGciOiJIUzI1NiIsInR5cCI6IkpXVCJ9.eyJhdWQiOlsiZHJlYW1zLWNyZWF0aW9uIl0sInVzZXJfbmFtZSI6ImRyZWFtcyIsInNjb3BlIjpbImFsbCJdLCJleHAiOjE3MzY4Mzc0NjIsImF1dGhvcml0aWVzIjpbImQxIl0sImp0aSI6IjNlY2E2OGU5LTVlMWMtNGEyNi1hNGJjLWY4MDkzYTVmMjc1ZSIsImNsaWVudF9pZCI6IkRyZWFtc1dlYkFwcCJ9.3irJ131WJMeLNqBBoW-YO0xoJdNUdVgB9aFF73c7U50
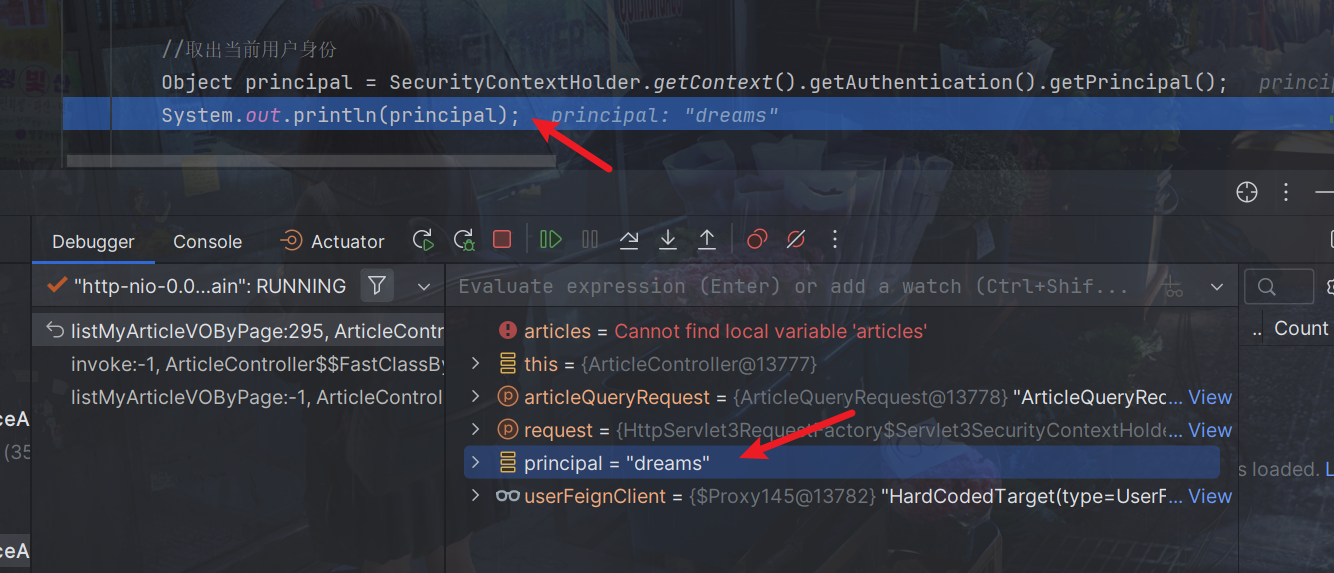
那如果资源服务里需要用户信息,就可以从JWT的token里获取,使用上下文的SecurityContextHolder
Object principal = SecurityContextHolder.getContext().getAuthentication().getPrincipal();
System.out.println(principal);
我们看最后一列,可以看到用户信息已经保存进去了,使用上下文的SecurityContextHolder获取即可
7.网关认证
所有访问微服务的请求都要经过网关,在网关进行用户身份的认证可以将很多非法的请求拦截到微服务以外,这叫做网关认证。
<dependency>
    <groupId>org.springframework.cloud</groupId>
    <artifactId>spring-cloud-starter-security</artifactId>
</dependency>
<dependency>
    <groupId>org.springframework.cloud</groupId>
    <artifactId>spring-cloud-starter-oauth2</artifactId>
</dependency>
<dependency>
    <groupId>org.projectlombok</groupId>
    <artifactId>lombok</artifactId>
</dependency>
<dependency>
    <groupId>com.alibaba</groupId>
    <artifactId>fastjson</artifactId>
</dependency>
同样需要配置类
GatewayAuthFilter
package com.dreams.creation.config;

import com.alibaba.fastjson.JSON;
import lombok.extern.slf4j.Slf4j;
import org.apache.commons.lang.StringUtils;
import org.springframework.beans.factory.annotation.Autowired;
import org.springframework.cloud.gateway.filter.GatewayFilterChain;
import org.springframework.cloud.gateway.filter.GlobalFilter;
import org.springframework.core.Ordered;
import org.springframework.core.io.buffer.DataBuffer;
import org.springframework.http.HttpStatus;
import org.springframework.http.server.reactive.ServerHttpResponse;
import org.springframework.security.oauth2.common.OAuth2AccessToken;
import org.springframework.security.oauth2.common.exceptions.InvalidTokenException;
import org.springframework.security.oauth2.provider.token.TokenStore;
import org.springframework.stereotype.Component;
import org.springframework.util.AntPathMatcher;
import org.springframework.web.server.ServerWebExchange;
import reactor.core.publisher.Mono;

import java.io.InputStream;
import java.nio.charset.StandardCharsets;
import java.util.ArrayList;
import java.util.List;
import java.util.Properties;
import java.util.Set;

/**
 * @description 网关认证过虑器
 */
@Component
@Slf4j
public class GatewayAuthFilter implements GlobalFilter, Ordered {


    //白名单
    private static List<String> whitelist = null;

    static {
        //加载白名单
        try (
                InputStream resourceAsStream = GatewayAuthFilter.class.getResourceAsStream("/security-whitelist.properties");
        ) {
            Properties properties = new Properties();
            properties.load(resourceAsStream);
            Set<String> strings = properties.stringPropertyNames();
            whitelist= new ArrayList<>(strings);

        } catch (Exception e) {
            log.error("加载/security-whitelist.properties出错:{}",e.getMessage());
            e.printStackTrace();
        }


    }

    @Autowired
    private TokenStore tokenStore;


    @Override
    public Mono<Void> filter(ServerWebExchange exchange, GatewayFilterChain chain) {
        String requestUrl = exchange.getRequest().getPath().value();
        AntPathMatcher pathMatcher = new AntPathMatcher();
        //白名单放行
        for (String url : whitelist) {
            if (pathMatcher.match(url, requestUrl)) {
                return chain.filter(exchange);
            }
        }

        //检查token是否存在
        String token = getToken(exchange);
        if (StringUtils.isBlank(token)) {
            return buildReturnMono("没有认证",exchange);
        }
        //判断是否是有效的token
        OAuth2AccessToken oAuth2AccessToken;
        try {
            oAuth2AccessToken = tokenStore.readAccessToken(token);

            boolean expired = oAuth2AccessToken.isExpired();
            if (expired) {
                return buildReturnMono("认证令牌已过期",exchange);
            }
            return chain.filter(exchange);
        } catch (InvalidTokenException e) {
            log.info("认证令牌无效: {}", token);
            return buildReturnMono("认证令牌无效",exchange);
        }

    }

    /**
     * 获取token
     */
    private String getToken(ServerWebExchange exchange) {
        String tokenStr = exchange.getRequest().getHeaders().getFirst("Authorization");
        if (StringUtils.isBlank(tokenStr)) {
            return null;
        }
        String token = tokenStr.split(" ")[1];
        if (StringUtils.isBlank(token)) {
            return null;
        }
        return token;
    }


    private Mono<Void> buildReturnMono(String error, ServerWebExchange exchange) {
        ServerHttpResponse response = exchange.getResponse();
        String jsonString = JSON.toJSONString(new RestErrorResponse(error));
        byte[] bits = jsonString.getBytes(StandardCharsets.UTF_8);
        DataBuffer buffer = response.bufferFactory().wrap(bits);
        response.setStatusCode(HttpStatus.UNAUTHORIZED);
        response.getHeaders().add("Content-Type", "application/json;charset=UTF-8");
        return response.writeWith(Mono.just(buffer));
    }


    @Override
    public int getOrder() {
        return 0;
    }
}
RestErrorResponse
package com.dreams.creation.config;

import java.io.Serializable;

/**
 * 错误响应参数包装
 */
public class RestErrorResponse implements Serializable {

    private String errMessage;

    public RestErrorResponse(String errMessage){
        this.errMessage= errMessage;
    }

    public String getErrMessage() {
        return errMessage;
    }

    public void setErrMessage(String errMessage) {
        this.errMessage = errMessage;
    }
}
SecurityConfig
package com.dreams.creation.config;

import org.springframework.context.annotation.Bean;
import org.springframework.context.annotation.Configuration;
import org.springframework.security.config.annotation.web.reactive.EnableWebFluxSecurity;
import org.springframework.security.config.web.server.ServerHttpSecurity;
import org.springframework.security.web.server.SecurityWebFilterChain;

/**
 * @description 安全配置类
 */
 @EnableWebFluxSecurity
 @Configuration
 public class SecurityConfig {


  //安全拦截配置
  @Bean
  public SecurityWebFilterChain webFluxSecurityFilterChain(ServerHttpSecurity http) {

   return http.authorizeExchange()
           .pathMatchers("/**").permitAll()
           .anyExchange().authenticated()
           .and().csrf().disable().build();
  }


 }
TokenConfig
package com.dreams.creation.config;

import org.springframework.beans.factory.annotation.Autowired;
import org.springframework.context.annotation.Bean;
import org.springframework.context.annotation.Configuration;
import org.springframework.security.oauth2.provider.token.TokenStore;
import org.springframework.security.oauth2.provider.token.store.JwtAccessTokenConverter;
import org.springframework.security.oauth2.provider.token.store.JwtTokenStore;

@Configuration
public class TokenConfig {

    String SIGNING_KEY = "dreams-jwt-key";


//    @Bean
//    public TokenStore tokenStore() {
//        //使用内存存储令牌(普通令牌)
//        return new InMemoryTokenStore();
//    }

    @Autowired
    private JwtAccessTokenConverter accessTokenConverter;

    @Bean
    public TokenStore tokenStore() {
        return new JwtTokenStore(accessTokenConverter());
    }

    @Bean
    public JwtAccessTokenConverter accessTokenConverter() {
        JwtAccessTokenConverter converter = new JwtAccessTokenConverter();
        converter.setSigningKey(SIGNING_KEY);
        return converter;
    }


}
在resources目录下加入白名单文件
security-whitelist.properties
/auth/**
上面的网关已经做了校验
资源服务的ResouceServerConfig文件就可以注释掉antMatchers配置了
@Override
public void configure(HttpSecurity http) throws Exception {
    http.csrf().disable()
            .authorizeRequests()
            //.antMatchers("/article/**").authenticated()//所有/article/**的请求必须认证通过
            .anyRequest().permitAll()
    ;
}
现在直接访问网关就可以
出现报错
io.lettuce.core.RedisCommandExecutionException: NOAUTH Authentication required.
at io.lettuce.core.ExceptionFactory.createExecutionException(ExceptionFactory.java:135) ~[lettuce-core-5.3.5.RELEASE.jar:5.3.5.RELEASE]
Suppressed: reactor.core.publisher.FluxOnAssembly$OnAssemblyException:
Error has been observed at the following site(s):
|_ checkpoint ⇢ org.springframework.security.web.server.savedrequest.ServerRequestCacheWebFilter [DefaultWebFilterChain]
|_ checkpoint ⇢ org.springframework.security.web.server.context.SecurityContextServerWebExchangeWebFilter [DefaultWebFilterChain]
|_ checkpoint ⇢ org.springframework.security.web.server.context.ReactorContextWebFilter [DefaultWebFilterChain]
|_ checkpoint ⇢ org.springframework.security.web.server.header.HttpHeaderWriterWebFilter [DefaultWebFilterChain]
|_ checkpoint ⇢ org.springframework.security.config.web.server.ServerHttpSecurity$ServerWebExchangeReactorContextWebFilter [DefaultWebFilterChain]
|_ checkpoint ⇢ org.springframework.security.web.server.WebFilterChainProxy [DefaultWebFilterChain]
|_ checkpoint ⇢ org.springframework.boot.actuate.metrics.web.reactive.server.MetricsWebFilter [DefaultWebFilterChain]
|_ checkpoint ⇢ HTTP POST "/api/article/article/list/page/vo" [ExceptionHandlingWebHandler]
Stack trace:
NOAUTH Authentication required 错误通常是 Redis 服务器要求身份验证,但在连接时没有提供正确的认证凭据。
所以在网关redis配置加上即可
spring:
  redis:
    database: 1
    host: localhost
    port: 6379
    timeout: 5000
    password: 123456
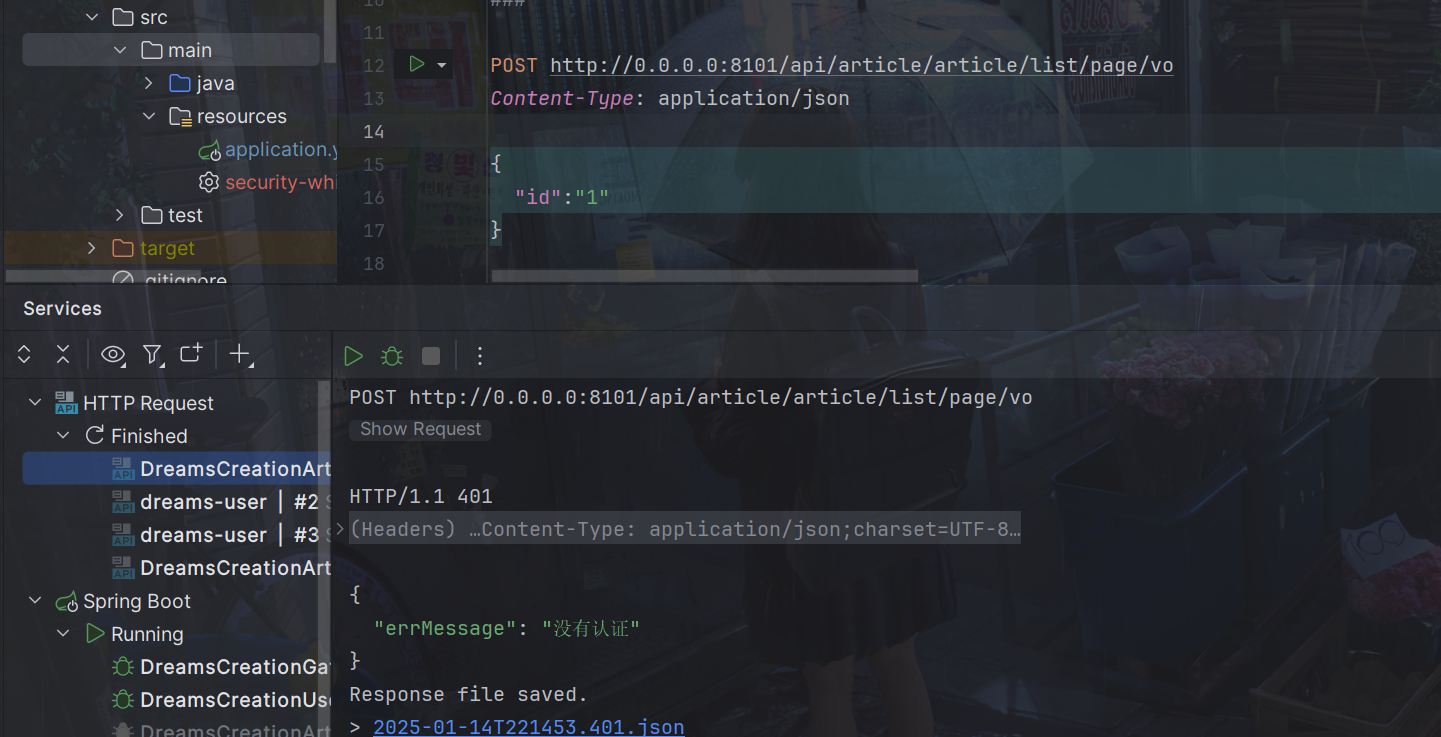
比如不带token
POST http://0.0.0.0:8101/api/article/article/list/page/vo
Content-Type: application/json

{
  "id":"1"
}
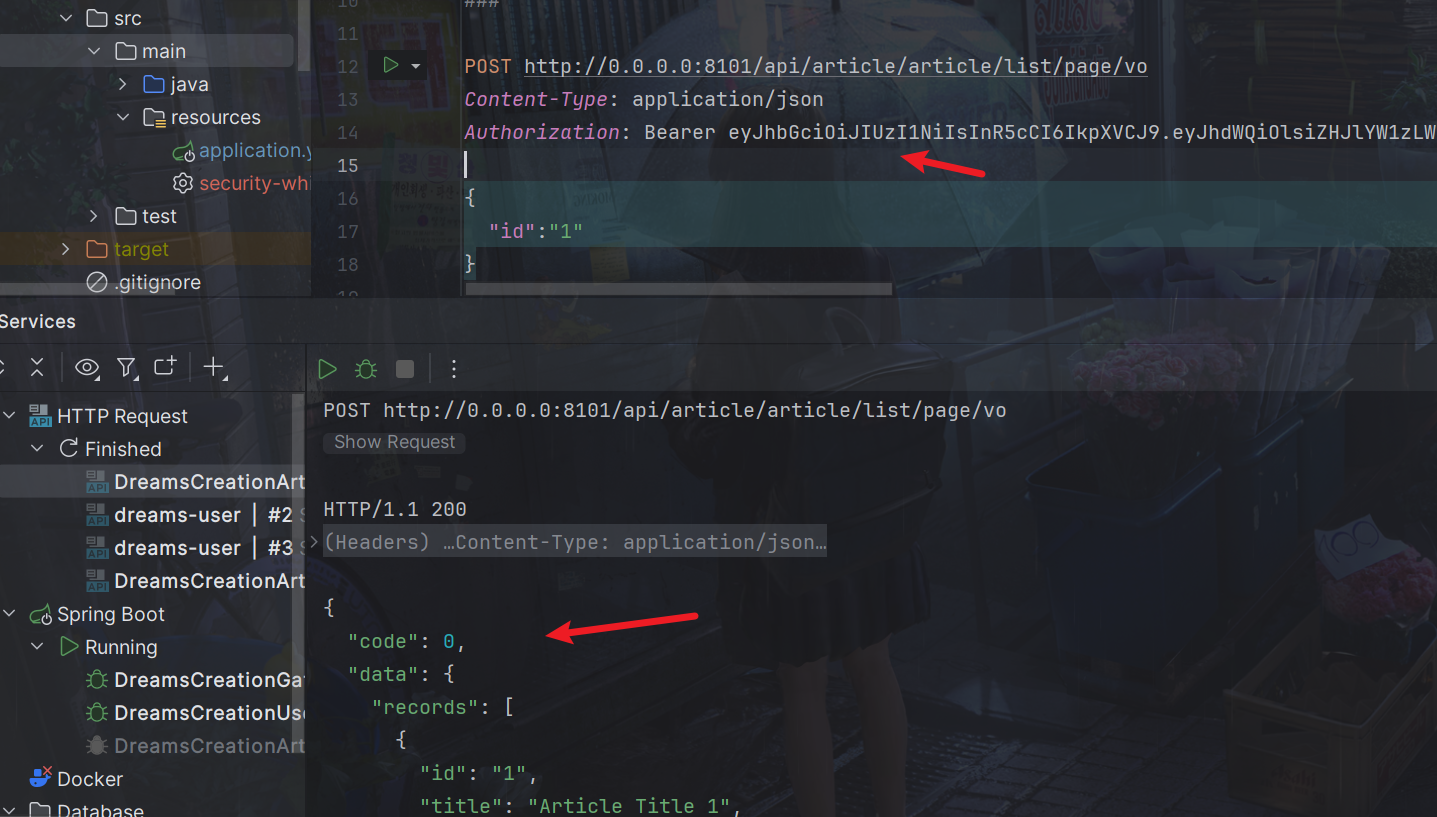
带了token
POST http://0.0.0.0:8101/api/article/article/list/page/vo
Content-Type: application/json
Authorization: Bearer eyJhbGciOiJIUzI1NiIsInR5cCI6IkpXVCJ9.eyJhdWQiOlsiZHJlYW1zLWNyZWF0aW9uIl0sInVzZXJfbmFtZSI6ImRyZWFtcyIsInNjb3BlIjpbImFsbCJdLCJleHAiOjE3MzY4Njk2MTUsImF1dGhvcml0aWVzIjpbImQxIl0sImp0aSI6IjRlMzYwNDIyLTliNzMtNDI5MS1iMWY4LTgzNWU1M2ZjNWJiOCIsImNsaWVudF9pZCI6IkRyZWFtc1dlYkFwcCJ9.J73OOgoZXtQ4XRirAfeAtL8Bj7mm3VLgZvvPdre_Qes

{
  "id":"1"
}
不过这个请求不应该认证,那就加入白名单
security-whitelist.properties
/auth/**
/api/article/article/get/vo
/api/article/article/list/page
/api/article/article/list/page/vo
我们的knife4j的文档也要放行
这里比如有两个服务user模块和article模块
/api/user/doc.html/**
/api/article/doc.html/**
/api/article/webjars/**
/api/article/favicon.ico
/api/article/v2/**
/api/article/swagger-resources/**
/api/user/webjars/**
/api/user/favicon.ico
/api/user/v2/**
/api/user/swagger-resources/**
8.数据库认证
认证服务,也就是auth-service模块的WebSecurityConfig文件
我们之前的配置是写死的
注释掉下面代码
//配置用户信息服务
//@Bean
//public UserDetailsService userDetailsService() {
//    //这里配置用户信息,这里暂时使用这种方式将用户存储在内存中
//    InMemoryUserDetailsManager manager = new InMemoryUserDetailsManager();
//    manager.createUser(User.withUsername("dreams").password("123").authorities("d1").build());
//    manager.createUser(User.withUsername("admin").password("123").authorities("d2").build());
//    return manager;
//}
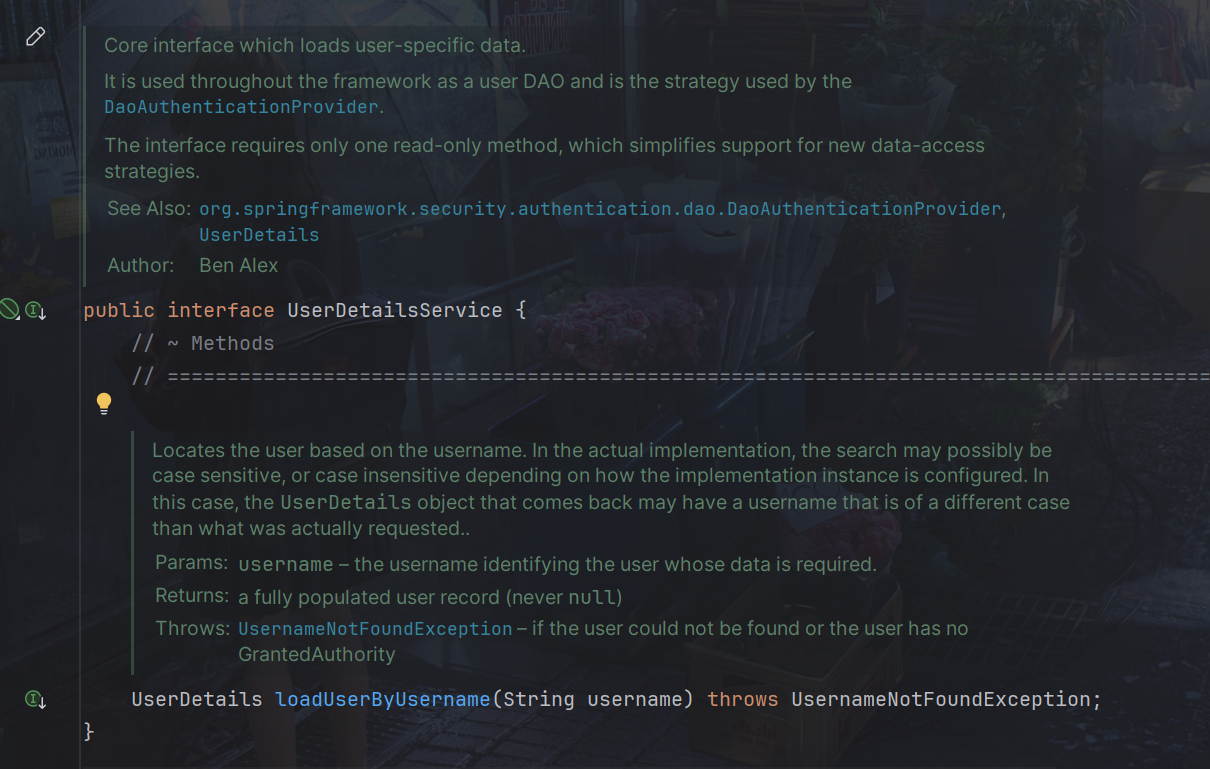
这里的UserDetailsService是接口
AuthenticationManager接口(认证管理器)是认证相关的核心接口,也是发起认证的出发点,它的实现类为ProviderManager。而Spring Security支持多种认证方式,因此ProviderManager维护着一个List<AuthenticationProvider>列表,存放多种认证方式,最终实际的认证工作是由AuthenticationProvider完成的。
web表单的对应的AuthenticationProvider实现类为DaoAuthenticationProvider,它的内部又维护着一个UserDetailsService负责UserDetails的获取。最终AuthenticationProvider将UserDetails填充至Authentication。
用户提交账号和密码由DaoAuthenticationProvider调用UserDetailsService的loadUserByUsername()方法获取UserDetails用户信息。
查询DaoAuthenticationProvider的源代码如下:
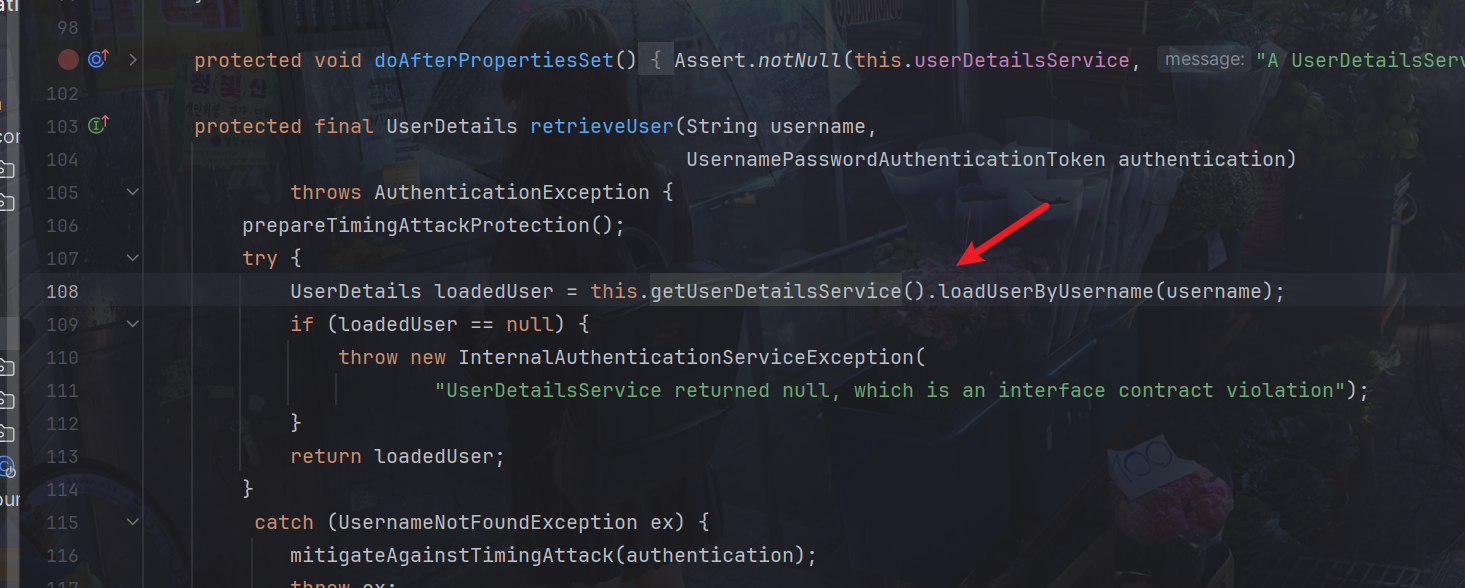
我们只要实现UserDetailsService 接口查询数据库得到用户信息返回UserDetails 类型的用户信息即可
package com.dreams.creation.service.impl;

import com.baomidou.mybatisplus.core.conditions.query.LambdaQueryWrapper;

import com.dreams.creation.model.entity.DcUser;
import com.dreams.creation.service.UserFeignClient;
import org.springframework.security.core.userdetails.User;
import org.springframework.security.core.userdetails.UserDetails;
import org.springframework.security.core.userdetails.UserDetailsService;
import org.springframework.security.core.userdetails.UsernameNotFoundException;
import org.springframework.stereotype.Service;

import javax.annotation.Resource;

/**
 * @author PoemsAndDreams
 * @date 2025-01-16 18:57
 * @description //TODO
 */
@Service
public class UserDetailsServiceImpl implements UserDetailsService {

    @Resource
    private UserFeignClient userFeignClient;

    @Override
    public UserDetails loadUserByUsername(String userAccount) throws UsernameNotFoundException {
        DcUser user = userFeignClient.selectOne(new LambdaQueryWrapper<DcUser>().eq(DcUser::getUserAccount, userAccount));
        if(user==null){
            //返回空表示用户不存在
            return null;
        }
        //取出数据库存储的正确密码
        String password  =user.getUserPassword();
        //用户权限,如果不加报Cannot pass a null GrantedAuthority collection
        String[] authorities= {"test"};
        //创建UserDetails对象,权限信息待实现授权功能时再向UserDetail中加入
        UserDetails userDetails = User.withUsername(user.getUserAccount()).password(password).authorities(authorities).build();

        return userDetails;
    }
}
这里注意要加上@Service注解,才能加入spring生命周期,替换掉框架的UserDetailsService
数据库中的密码加过密的,用户输入的密码是明文,我们需要修改密码格式器PasswordEncoder,原来使用的是NoOpPasswordEncoder,它是通过明文方式比较密码,现在我们修改为BCryptPasswordEncoder,它是将用户输入的密码编码为BCrypt格式与数据库中的密码进行比对。
修改认证服务,也就是auth-service模块的WebSecurityConfig文件
@Bean
public PasswordEncoder passwordEncoder() {
    //密码为明文方式
    //return NoOpPasswordEncoder.getInstance();
    //
    return new BCryptPasswordEncoder();
}
修改数据库中的密码为Bcrypt格式,并且记录明文密码,稍后申请令牌时需要。
由于修改密码编码方式还需要将客户端的密钥更改为Bcrypt格式.
同样修改auth-service模块的AuthorizationServer文件
//客户端详情服务
@Override
public void configure(ClientDetailsServiceConfigurer clients)
        throws Exception {
      clients.inMemory()// 使用in-memory存储
              .withClient("DreamsWebApp")// client_id
              //.secret("DreamsWebApp")//客户端密钥
              .secret(new BCryptPasswordEncoder().encode("DreamsWebApp"))//客户端密钥
              .resourceIds("dreams-creation")//资源列表
              .authorizedGrantTypes("authorization_code", "password","client_credentials","implicit","refresh_token")// 该client允许的授权类型authorization_code,password,refresh_token,implicit,client_credentials
              .scopes("all")// 允许的授权范围
              .autoApprove(false)//false跳转到授权页面
              //客户端接收授权码的重定向地址
              .redirectUris("http://www.tandream.site")
 ;
}
因为我们展示还没有实现认证,所以暂时将白名单全部开放
/**
/api/article/article/get/vo
/api/article/article/list/page
/api/article/article/list/page/vo
请求
POST http://localhost:8101/api/user/oauth/token?client_id=DreamsWebApp&client_secret=DreamsWebApp&grant_type=password&username=user3&password=111111
可以看到正确返回了
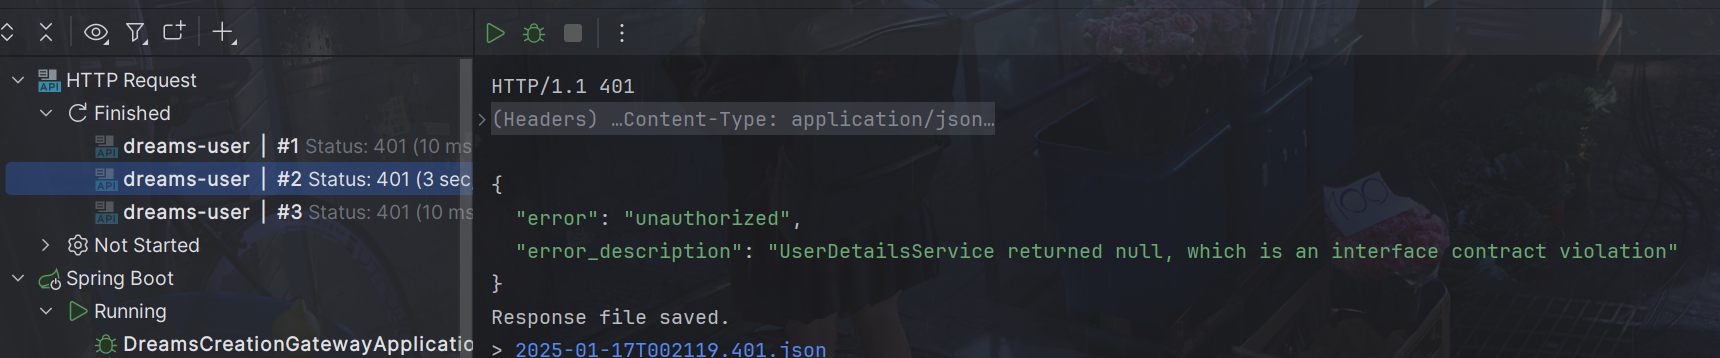
如果输入账户错误的返回
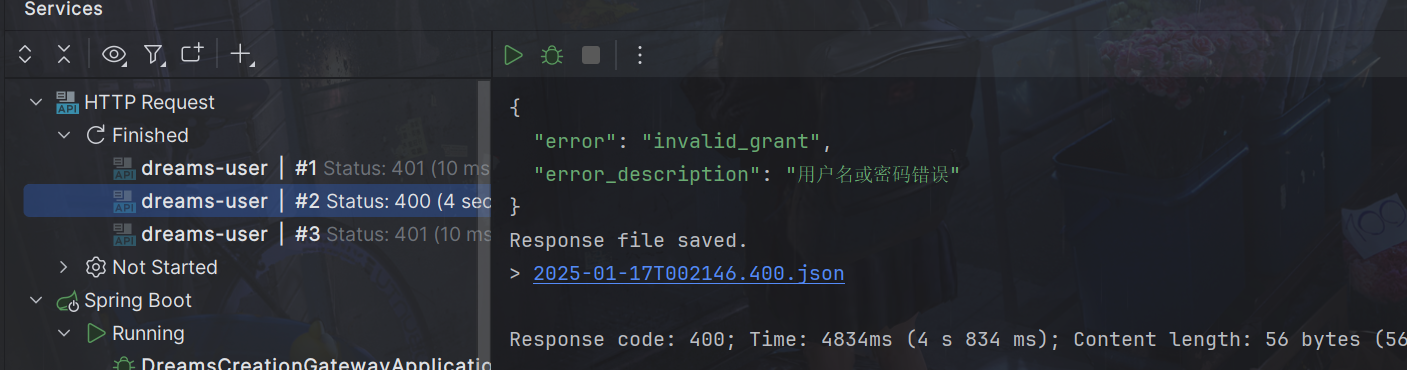
密码错误的返回
9.扩展用户信息
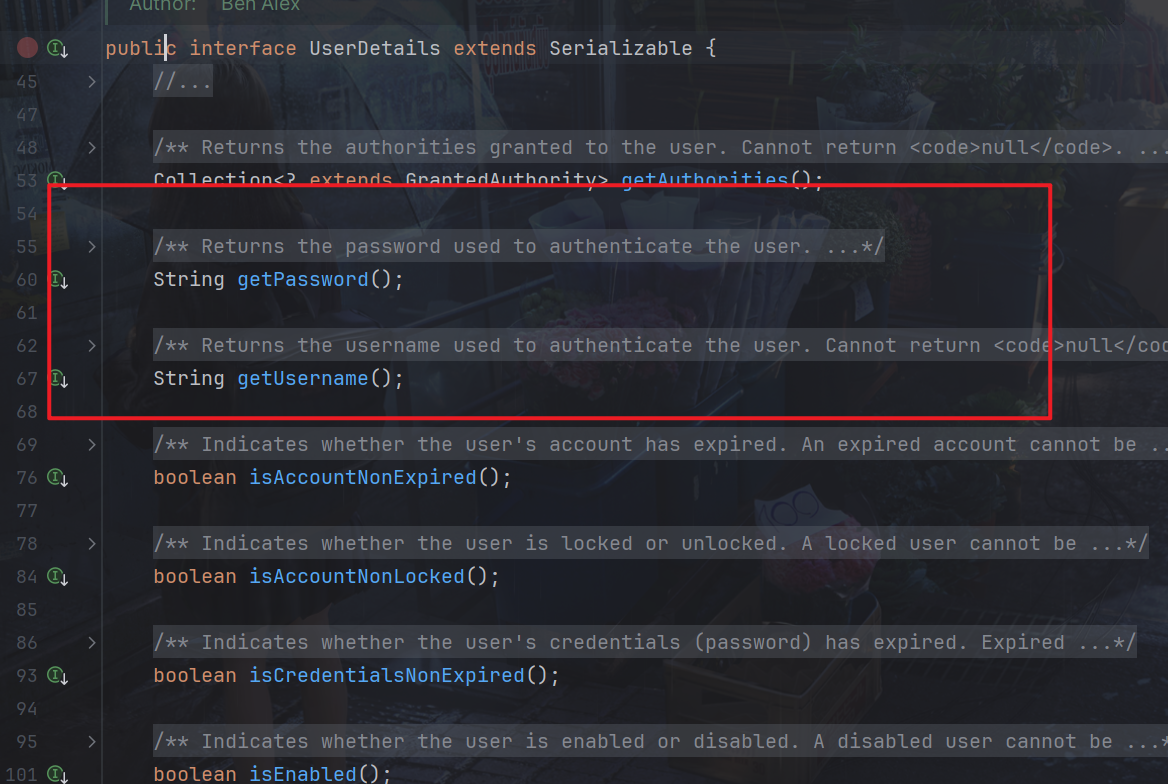
UserDetails接口只返回了username、密码等信息
我们可以直接扩展UserDetails接口,不过还有更简单的方法,那就是直接将User信息转换为JSON放入userName中
package com.dreams.creation.service.impl;

import com.alibaba.fastjson.JSON;
import com.baomidou.mybatisplus.core.conditions.query.LambdaQueryWrapper;

import com.dreams.creation.model.entity.DcUser;
import com.dreams.creation.service.UserFeignClient;
import org.springframework.security.core.userdetails.User;
import org.springframework.security.core.userdetails.UserDetails;
import org.springframework.security.core.userdetails.UserDetailsService;
import org.springframework.security.core.userdetails.UsernameNotFoundException;
import org.springframework.stereotype.Service;

import javax.annotation.Resource;

/**
 * @author PoemsAndDreams
 * @date 2025-01-16 18:57
 * @description //TODO
 */
@Service
public class UserDetailsServiceImpl implements UserDetailsService {

    @Resource
    private UserFeignClient userFeignClient;

    @Override
    public UserDetails loadUserByUsername(String userAccount) throws UsernameNotFoundException {
        DcUser user = userFeignClient.selectOne(new LambdaQueryWrapper<DcUser>().eq(DcUser::getUserAccount, userAccount));
        if(user==null){
            //返回空表示用户不存在
            return null;
        }
        //取出数据库存储的正确密码
        String password  =user.getUserPassword();
        //用户权限,如果不加报Cannot pass a null GrantedAuthority collection
        String[] authorities= {"test"};
        //为了安全在令牌中不放密码
        user.setUserPassword(null);
        //将user对象转json
        String userString = JSON.toJSONString(user);
        //创建UserDetails对象
        UserDetails userDetails = User.withUsername(userString).password(password).authorities(authorities).build();

        return userDetails;
    }
}
那么资源服务里,比如article-service,就可以加个工具类解析他
package com.dreams.creation.util;

import com.alibaba.fastjson.JSON;
import com.dreams.creation.model.entity.DcUser;
import lombok.extern.slf4j.Slf4j;
import org.springframework.security.core.context.SecurityContextHolder;

@Slf4j
public class SecurityUtil {
    public static DcUser getUser() {
        try {
            Object principalObj = SecurityContextHolder.getContext().getAuthentication().getPrincipal();
            if (principalObj instanceof String) {
                //取出用户身份信息
                String principal = principalObj.toString();
                //将json转成对象
                DcUser user = JSON.parseObject(principal, DcUser.class);
                return user;
            }
        } catch (Exception e) {
            log.error("获取当前登录用户身份出错:{}", e.getMessage());
            e.printStackTrace();
        }

        return null;
    }
}
使用方法
//取出当前用户身份
//Object principal = SecurityContextHolder.getContext().getAuthentication().getPrincipal();
//System.out.println(principal);
DcUser user = SecurityUtil.getUser();
如果直接在user-service实现类似getLoginUser方法,在getLoginUser方法里使用SecurityUtil.getUser(),其他服务通过userFeignClient.getLoginUser()调用是不行的,因为没有经过网关,是获取不到用户的。
10.统一入口
为了支持不同的登录方式,比如微信扫码,账户密码等,所以需要一个统一传入的类
package com.dreams.creation.model.dto.user;

import lombok.Data;
import java.util.HashMap;
import java.util.Map;

@Data
public class AuthParamsDto {

    private String userAccount; //用户账户
    private String userPassword; //域  用于扩展
    private String cellphone;//手机号
    private String checkCode;//验证码
    private String checkCodeKey;//验证码key
    private String authType; // 认证的类型   password:用户名密码模式类型    sms:短信模式类型
    private Map<String, Object> payload = new HashMap<>();//附加数据,作为扩展,不同认证类型可拥有不同的附加数据。如认证类型为短信时包含smsKey : sms:3d21042d054548b08477142bbca95cfa; 所有情况下都包含clientId

}
同样传入的时候转JSON
package com.dreams.creation.service.impl;

import com.alibaba.fastjson.JSON;
import com.baomidou.mybatisplus.core.conditions.query.LambdaQueryWrapper;


import com.dreams.creation.model.dto.user.AuthParamsDto;
import com.dreams.creation.model.entity.DcUser;
import com.dreams.creation.service.UserFeignClient;
import org.springframework.security.core.userdetails.User;
import org.springframework.security.core.userdetails.UserDetails;
import org.springframework.security.core.userdetails.UserDetailsService;
import org.springframework.security.core.userdetails.UsernameNotFoundException;
import org.springframework.stereotype.Service;

import javax.annotation.Resource;

/**
 * @author PoemsAndDreams
 * @date 2025-01-16 18:57
 * @description //TODO
 */
@Service
public class UserDetailsServiceImpl implements UserDetailsService {

    @Resource
    private UserFeignClient userFeignClient;

    @Override
    public UserDetails loadUserByUsername(String authParams) throws UsernameNotFoundException {


        AuthParamsDto authParamsDto = null;
        try {
            //将认证参数转为AuthParamsDto类型
            authParamsDto = JSON.parseObject(authParams, AuthParamsDto.class);
        } catch (Exception e) {
            // todo 日志
            throw new RuntimeException("认证请求数据格式不对");
        }
        //账号
        String userAccount = authParamsDto.getUserAccount();


        DcUser user = userFeignClient.selectOne(new LambdaQueryWrapper<DcUser>().eq(DcUser::getUserAccount, userAccount));
        if(user==null){
            //返回空表示用户不存在
            return null;
        }
        //取出数据库存储的正确密码
        String password  =user.getUserPassword();
        //用户权限,如果不加报Cannot pass a null GrantedAuthority collection
        String[] authorities= {"test"};
        //为了安全在令牌中不放密码
        user.setUserPassword(null);
        //将user对象转json
        String userString = JSON.toJSONString(user);
        //创建UserDetails对象
        UserDetails userDetails = User.withUsername(userString).password(password).authorities(authorities).build();

        return userDetails;
    }
}
原来的DaoAuthenticationProvider 会进行密码校验

现在重新定义DaoAuthenticationProviderCustom类,重写类的additionalAuthenticationChecks方法。
package com.dreams.creation.config;

import org.springframework.beans.factory.annotation.Autowired;
import org.springframework.security.authentication.UsernamePasswordAuthenticationToken;
import org.springframework.security.authentication.dao.DaoAuthenticationProvider;
import org.springframework.security.core.AuthenticationException;
import org.springframework.security.core.userdetails.UserDetails;
import org.springframework.security.core.userdetails.UserDetailsService;
import org.springframework.stereotype.Component;

@Component
public class DaoAuthenticationProviderCustom extends DaoAuthenticationProvider {


    @Autowired
    public void setUserDetailsService(UserDetailsService userDetailsService) {
        super.setUserDetailsService(userDetailsService);
    }


    //屏蔽密码对比
    protected void additionalAuthenticationChecks(UserDetails userDetails, UsernamePasswordAuthenticationToken authentication) throws AuthenticationException {


    }

}
修改auth-service的WebSecurityConfig注入Bean
@Autowired
DaoAuthenticationProviderCustom daoAuthenticationProviderCustom;


@Override
protected void configure(AuthenticationManagerBuilder auth) throws Exception {
    auth.authenticationProvider(daoAuthenticationProviderCustom);
}
接着我们使用策略模式优化一下
先定义一个扩展类
package com.dreams.creation.model.dto.user;

import com.dreams.creation.model.entity.DcUser;
import lombok.Data;
import java.util.ArrayList;
import java.util.List;

/**
 * @description 用户扩展信息
 */
@Data
public class DcUserExt extends DcUser {
    //用户权限
    List<String> permissions = new ArrayList<>();
}
统一接口
package com.dreams.creation.service;
import com.dreams.creation.model.dto.user.AuthParamsDto;
import com.dreams.creation.model.dto.user.DcUserExt;

/**
 * @description 统一的认证接口
 */
public interface AuthService {

 /**
  * @description 认证方法
  * @param authParamsDto 认证参数
  * @return com.dreams.creation.model.dto.user.DcUser 用户信息
  */
 DcUserExt execute(AuthParamsDto authParamsDto);

}
UserDetailsServiceImpl统一调用就行
package com.dreams.creation.service.impl;

import com.alibaba.fastjson.JSON;
import com.dreams.creation.model.dto.user.AuthParamsDto;
import com.dreams.creation.model.dto.user.DcUserExt;
import com.dreams.creation.service.AuthService;
import org.springframework.beans.factory.annotation.Autowired;
import org.springframework.context.ApplicationContext;
import org.springframework.security.core.userdetails.User;
import org.springframework.security.core.userdetails.UserDetails;
import org.springframework.security.core.userdetails.UserDetailsService;
import org.springframework.security.core.userdetails.UsernameNotFoundException;
import org.springframework.stereotype.Service;

/**
 * @author PoemsAndDreams
 * @date 2025-01-16 18:57
 * @description //TODO
 */
@Service
public class UserDetailsServiceImpl implements UserDetailsService {

    @Autowired
    ApplicationContext applicationContext;


    @Override
    public UserDetails loadUserByUsername(String authParams) throws UsernameNotFoundException {


        AuthParamsDto authParamsDto = null;
        try {
            //将认证参数转为AuthParamsDto类型
            authParamsDto = JSON.parseObject(authParams, AuthParamsDto.class);
        } catch (Exception e) {
            // todo 日志
            throw new RuntimeException("认证请求数据格式不对");
        }
        //认证方法
        String authType = authParamsDto.getAuthType();
        AuthService authService =  applicationContext.getBean(authType + "_authService",AuthService.class);

        DcUserExt user = authService.execute(authParamsDto);

        return getUserPrincipal(user);
    }

    private UserDetails getUserPrincipal(DcUserExt user) {
        //取出数据库存储的正确密码
        String password  =user.getUserPassword();

        //用户权限,如果不加报Cannot pass a null GrantedAuthority collection
        String[] authorities= {"test"};
        //为了安全在令牌中不放密码
        user.setUserPassword(null);
        //将user对象转json
        String userString = JSON.toJSONString(user);
        //创建UserDetails对象
        UserDetails userDetails = User.withUsername(userString).password(password).authorities(authorities).build();

        return userDetails;
    }
}
后面整合验证码一起实现
11.参考内容
黑马-学成在线
尚硅谷-尚上优选